Make videos faster with Movie Studio
- Import your video material to the track at the top in Movie Studio.
- If you don't want to make the entire video faster: Cut the scene that you want to use the time lapse effect with. To do this, place the playback marker where you want to cut and click the Cut button.
- Open the Effects tab in the Media Pool and click on the "Speed" effects dialog. To create a time lapse effect, move the speed factor slider to the right.
- Using time lapse will make the scene shorter and create a gap in the track. You can drag the following scenes forward to fill this.
- Once you've finished editing, export your video as MP4 or another format, upload it online or burn it directly to DVD or Blu-ray.
Creative options for time lapse effects in Movie Studio Platinum:
- Diverse editing functions
- Speed up video with or without audio track
- Intuitive and seamless functions for creating time lapse
- Keyframe animation for transitions in speed
Time lapse: How to speed up videos
The time lapse effect accelerates the playback time of a video, which is why the effect is also called "fast motion". Time Lapse ist der englische Fachbegriff. The process is as easy as pie – you simply speed up the video to make time lapse.
As long as it's not over-used, time lapse brings heaps of dynamics to a film. This effect is often used in action movies to transform a carefully filmed scene into fast-paced action at a later point during post-production. In this way, the time lapse effect turns normal movements into rapid chain reactions, fight scenes or chases.
Extreme time lapse recordings can be used in documentaries that cover an aspect over a long period of time – so a starry sky rotates around the North Star, or a flower bud bursts open in seconds.
Sometimes, film makers gradually speed up a video recording before slowing it back down to normal speed. This effect is called a "speed ramp". It can be applied in order to accelerate the action but also exaggerate it – you can speed up video footage to make fun of a subject. When using the effect, the audio track is either kept in or faded out. Sometimes (for instance in nature documentaries or music videos) the audio track continues as normal without any time lapse editing.
The time lapse effect also offers a lot more creative possibilities than you might think at first glance. A simple fast motion effect without audio track can be achieved with a free app. However, for true flexibility and to really make the most of this effect, you need a high-performing video editing program. With Movie Studio by MAGIX, you can create static time lapse effects as well as dynamic speed ramping. The audio track can be included in the timelapse video or removed, or you can have the audio play at normal speed and only speed up the video material.
In the following, we'll show you step by step how to make a time lapse video in Movie Studio Platinum and also produce speed ramps with or without an audio track.
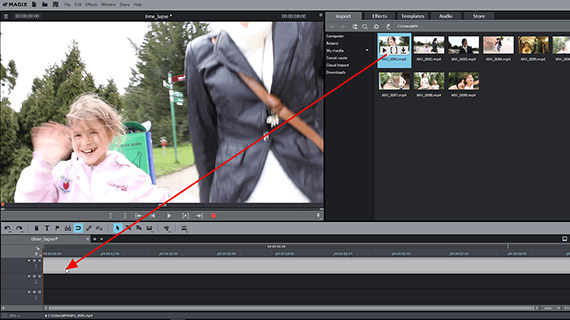
Step 1: Import video
- Open Movie Studio and create a new project.
- In the upper right area in the Media Pool, go to the folder containing your video files and click and hold to drag all files that you want to use into the top track in the project window.
Step 2: Speed up video
First, cut the scene that you want to speed up, if you're not creating time lapse for the entire video.
- Place the playback marker at the beginning of the scene and press the "T" key.
- Place the playback marker at the end of the scene and press the "T" key again.
Next, create a time lapse effect in the video scene you have cut:
- Click to select the scene in the project window.
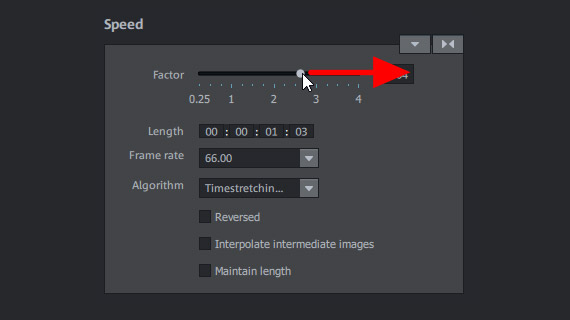
- In the Media Pool, open the Effects tab and click on the Speed tile.
- In the dialog, drag the slider all the way to the right.
Play back the scene and change the position of the slider until you've achieved the speed you want.
The time lapse effect speeds up the video. As a result, the video object will be shortened. If the scene is part of a longer video, using the effect will create a gap in the track.
- To close the gap on the track, simply click the object after the gap and pull it forward. If additional objects are present in the project range following the gap, switch to "Mouse mode for all tracks" first. This ensures that moving around the video objects does not result in unintended changes further on in the track.
Make videos faster with or without audio track
In general, the time lapse effect is applied to the image track and audio track simultaneously to ensure that the sound syncs with the image. For extreme time lapse, however, it's often better to forego the original sound, since the highly sped-up footage just produces annoying noise.
- To turn off the audio track when creating a time lapse video, right-click on the video and select the option Audio Functions > Mute Audio Object.
The downside of doing this is that there is now no sound for your video, and you have to provide an alternative audio track. You can use another video or an audio recording of your choice for this – simply drag it underneath the track with the time lapse video.
Alternatively you can leave the audio track of the time lapse video unchanged:
- Go to "Audio functions" > "Video/Audio on separate tracks".
- In the toolbar, ungroup image and sound.
- Select the image track and add the time lapse effect as outlined above.
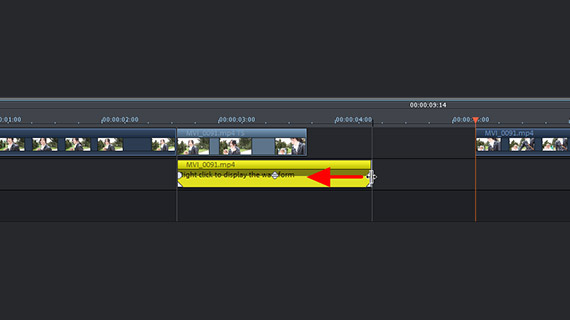
- This will shorten the image track, while the length of the audio object in the audio track remains unchanged. The standard way to deal with this is to shorten the audio track to the end of the image track: simply drag the end of the audio track ahead until it docks on to the end of the image track. As an alternative, you can add another image track above the audio track by using a different scene or video in which the sound has been turned off (as described above).
Create time lapse with speed ramps
In Movie Studio, you can also create professional speed ramps. Speed ramps are transitions in speed where the playback tempo of the video changes constantly, producing truly dynamic results.
How to generate a speed ramp:
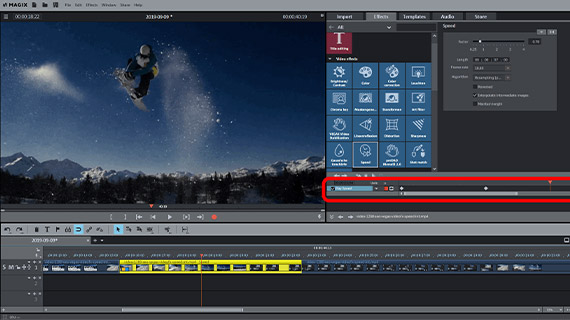
- In the bottom of the effect dialog, open the keyframe animation by dragging the dialog downwards.
- Position the playback marker where you want the speed ramp to begin.
- Set a keyframe for the position where you want the video to speed up.
- Move the cursor further right to where you want the fastest point to occur.
- Activate the time lapse effect in the dialog "Speed". The program will automatically set the right keyframe.
Your first speed ramp is now finished. The playback speed will steadily increase from the first keyframe to the second. You can modify keyframes and their corresponding effect values until you've found the right result.
To return to video's original speed using a second speed ramp:
- Set the playback marker at the position where you want the time lapse effect to slow down and add the third keyframe.
- Then, move the playback marker further back to where you want the movie to return to normal speed.
- Here, set the effect to 1.00 (= neutral position). A fourth keyframe will be automatically set.
The second speed ramp has now been created. From the fourth keyframe, the time lapse video plays again at normal speed.
Step 3: Export the timelapse video
You've now sped up your video and finished the time lapse editing process. There's now range of options for using your time lapse video:
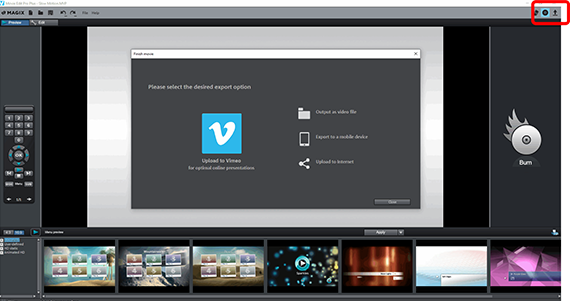
- To create a "proper" video file, go to File > Export movie. You can find all available file formats (e.g. MP4) in the submenu. There are a range of codec settings and presets available in the Export dialog.
- Above right in the program window, you'll see the "Export" dialog. From here, you can upload all video objects in the project window directly as a single video to YouTube or Vimeo, or transfer to smartphone.
- Also in the upper right-hand corner of the program window to the button to open the burn interface. You can burn your project to DVD or Blu-ray Disc including selection menus.


