Convert music CDs to digital files
– here's how it's done.
Want to know how to rip CD tracks to your computer?Keep reading to find out how.
- Download Music Maker Free, install the program and create a new, empty project.
- Insert an non-copy-protected audio CD into the drive and in Music Maker, select "File" > "Import" > "Import audio CD track(s)".
- Click on "Select all tracks" or select the CD tracks you want to convert to digital in the dialog by holding down the Ctrl key.
- Now click on "Save selected tracks". The CD tracks you have selected are stored as individual WAV files in a storage location of your choice.
Convert music CDs to digital files
Audio CDs are better protected from the ravages of time than vinyl records. But then again, CDs can be easily scratched and can't be used in a CD player as a result. That's why it makes sense to convert CDs to digital – i.e. digitize CD tracks into "normal" WAV files – in good time. These files can then be easily processed and archived by your PC.
You might have heard the term "rip a CD" or "grab a CD"; this refers to the process by which CDs are digitized. This is not copying as such, but a conversion of digital data that takes some time. You can then save the WAV files to your hard drive or cloud storage, or even use them as a sample library for creating your own music - as long as legal provisions allow it.
You can do all of this and more with the free version of Music Maker. Music Maker is not just a free tool that makes transferring CDs to MP3 easy, but a complete recording studio with hundreds of samples, virtual instruments, a mixer and effects that you can be expanded into a full-blown production environment if you want. Music Maker lets you select loops from audio CD tracks or the included Soundpool loops and use them for a whole range of tasks – such as creating a backing track for your own vocal recordings. Alternatively, you can play the integrated software instruments using your computer keyboard or with MIDI keyboard. You can then add the final touches to your arrangement with effects such as equalizer or compressor, and then mix down your tracks to produce the perfect song.
With Music Maker you can digitize your CD collection for free, archive it or use it as a sample library. Maybe there's a bass line, guitar riff or catchy song phrase somewhere that you'd like to use for your own songs?
Keep reading to learn about the best way to convert CDs to digital format – with Music Maker. We'll also show you how to use your digitized CDs to make music and cut loopable samples from the CD tracks.
Digitize your CD collection with Music Maker
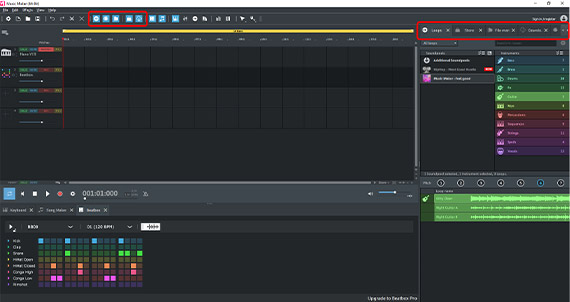
Start Music Maker Free
It's simple:
- Download the free version of Music Maker.
- Double-click the installation file you downloaded to install the software.
- Start Music Maker and create a new project using the start dialog.
- An empty project window will open. You can arrange or record your own audio files or the included loops on all tracks.
On the right, change the Media Pool to one of the four available views:
- "Loops" enables you to select on the included Soundpool loops, which you can use to produce your own sample-based music.
- "VST Instruments" displays a list of the currently available software instruments. These instruments can be played using your keyboard or a MIDI keyboard.
- "The file manager" allows you to import any audio files from any folder on your computer and use them for your own music production or to create song compilations, for example.
- "The Store" lists Soundpools, instruments, program modules and Editions that you can buy and then use directly in Music Maker. Your computer must be connected to the Internet for this purpose.
- "Downloads" displays program content you have already bought or acquired that are ready for download.
The hidden information can be activated at any time using the toolbar or the "View" menu.
Convert CD to MP3
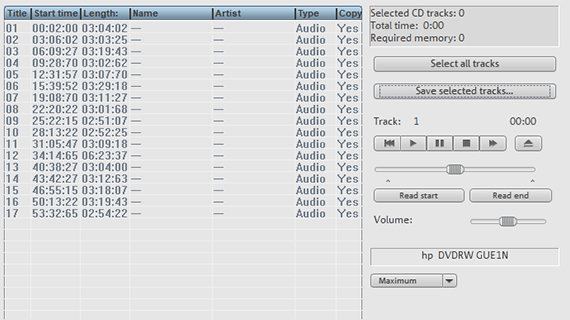
Unlike other audio files, you can't access audio CD tracks in the file manager. Although they are in a digital format, they must be "grabbed" or ripped" in a certain way so that the computer's file system can process them. This process of transferring music CDs to MP3 is also called "digitizing". Music Maker includes a special function in the "File" menu that enables you to digitize CDs.
- How it works is simple: to rip a CD, insert it into the drive.
- In the "File" menu > select "Import" > "Import audio CD track(s)".
A dialog with the tracklist will appear.
- Click "Select all tracks" or hold down the Ctrl key to select the CD tracks you want to convert to digital.
- Now click on "Save selected tracks".
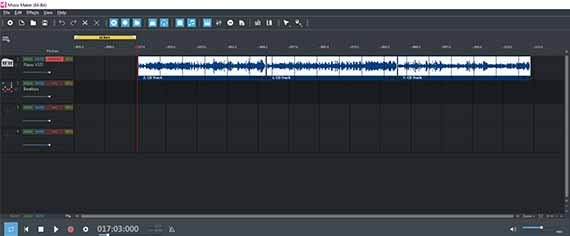
The CD tracks are then stored as individual WAV files in the folder and the newly digitized CD tracks can be copied to archive them for future use. The WAV files are simultaneously inserted as audio objects into the Music Maker project at the playback marker position.
Cut samples from music CD tracks
You can cut and edit the digitized music CD tracks in Music Maker the way you want, or use them for your own music production, for example, by creating the perfect samples from your CD tracks.
Note: Be aware of copyright issues before publishing a song you've created that contains samples from an audio CD! Even short clips are usually copyright-protected. If in doubt, check with the label that released the original track. There's a way you can keep things simple and avoid any issues – use the Soundpool samples included with Music Maker.
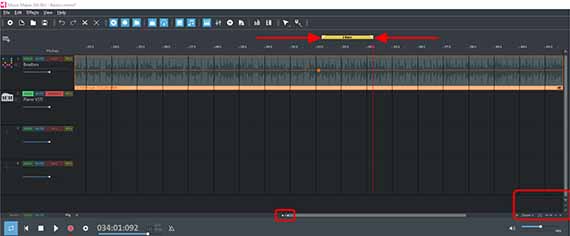
The easiest way to do this is to set the playback range to the desired length of the sample (for example, 2 bars or shorter).
- Below right in the track window, zoom in so that the display section does not cover more than approx. 20-30 bars.
- Move the yellow range bar above the first track together at its ends so that it covers about 2 bars (depending on the sample length you choose).
- Move the range over different parts of the CD track and have a listen each passage. You can use this method to listen out for suitable samples.
- Once you've found a section you want to sample, place the playback marker directly where the beginning and end of the sample should be cut and press the T key.
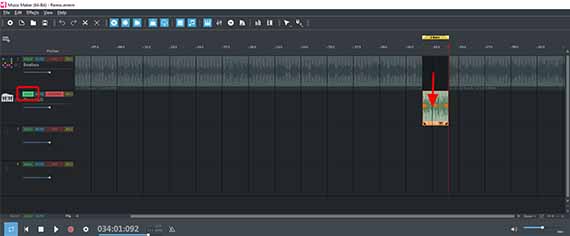
- Drag the sample you have extracted below to an empty track. If necessary, you can then finely adjust the cut borders with the mouse by dragging the borders further inwards or outwards.
- To create a loop from the sample, select the following option in the "Edit" menu, "Object" > "Loop range" > "Set custom loop". Now, the sample can be dragged out at its right object edge to create an continuous loop, just like the Soundpool loops.
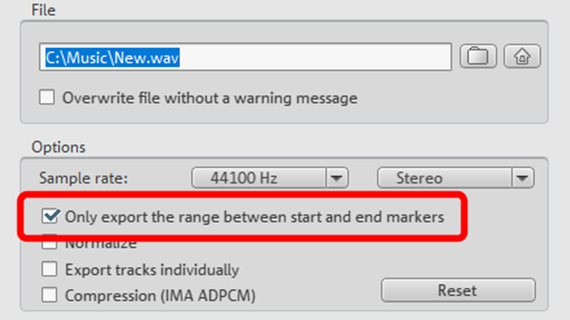
- To export the sample, adjust the playback range to fit the sample borders, switch the track with the sample to solo mode in the track header on the left and select "File" > Export" > "Audio as WAV/ADCPM".
- Activate the option "Only export the area between the start and end markers" in the WAV export dialog and start WAV export.
Automatic sample production with the
Remix Agent tool
Music Maker comes with a powerful wizard that automatically finds and cuts samples to create perfect loops. The best kind of music for this is rhythmic material that has a clear beat, such as jazz, pop or rock songs.
- Right-click the digitized CD track and select "Effects" > "Pitch, tempo & remix" > "Tempo & beat" recognition.
Or simply press the J key to open the "MAGIX Remix Agent" sampling wizard.
- Play back and stop a preview in the dialog by pressing the spacebar (i.e. the same as used for playback in the arrangement).
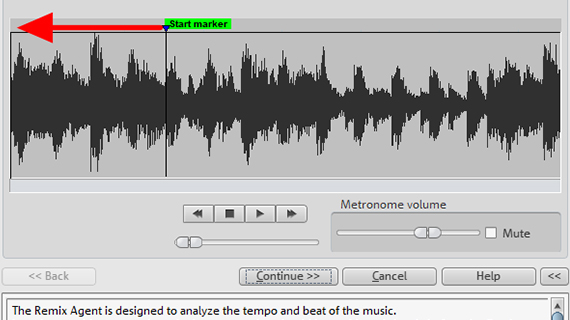
- Make sure first that the start marker displayed in the dialog is in the correct position. Move it to the position where the first beat of the rhythm begins. Then, click "Continue".
- Next, the program will set automatic beat markers. For each beat marker, an additional metronome sound will be added. The inserted metronome sounds should be as close as possible to the beats of the music. If necessary, correct the placement of the beat markers in the dialog until they are correct. Now, click on "Continue" again.
- The third step is to define the time signature. In most cases, this will be a 4/4 time signature, so each bar should contain four beats. During playback, count the metronome beats and check to see if the first, louder beat is played at the beginning of a bar. For this it must be positioned "on the one" i.e. the first beat of the bar. If you are unsure, don't worry – the most important thing is that the metronome beats are on the beats (step 2). Now, click on "Continue" again.
- In the final step of the Remix Agent dialog, select the "Create remix objects" option.
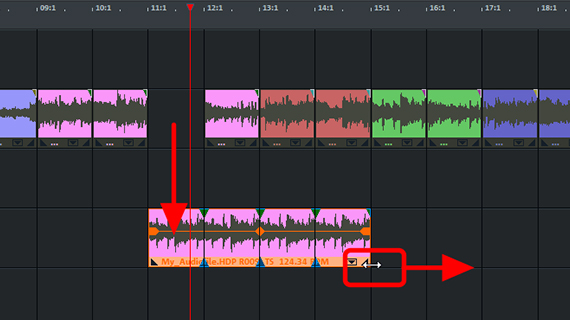
Your CD track will now be broken down into a number of small samples that can be freely moved, rearranged and looped in the arranger. These loops can be used to form a foundation for your own remix of the same song.


Start your music
journey today
Create songs with loops, experiment with effects, and push
your creativity – all in MUSIC MAKER Free.
