Change video format
– here's how!
To change a video to another video format, follow these steps:
- Open MAGIX Movie Studio and import the video files for which you want to change video format.
- (Optional) Cut the videos the way you want or optimize their image and sound.
- Under File > Export film, select a video format (e.g. MP4 or MPG). Alternatively, you can use the intuitive batch conversion tool in the File menu to convert all video files in one go.
Change video formats with Movie Studio, the video editing software for downright amazing movies:
- Import all common video formats
- Quick and easy sort and cut features
- Helpful program wizards
- Convert into all essential video formats
Change video format
Not all video formats work on players. Even if your video can be played on your PC without a hitch, this doesn't mean you can present it on your tablet. In many cases, you'll see the error message "Video format not supported", which can really dampen the excitement of sharing your video.
This isn't a problem for Movie Studio users, since they not only have a comprehensive video editing program to hand, but a versatile format converter too. Movie Studio supports all current video formats, plus enables you to quickly and easily change the video format of your videos or favorite films. This means you can work without worrying about video formats or the requirements of individual playback devices.
It's easy. Start by importing the video file you want to convert. It's possible to import multiple videos with different formats at once and then combine them into a single, "proper" video file. You choose the video format you want and export your videos in a format such as MP4 or MPEG. The result is a fully independent, new video file that can be played on any playback device with no problems. In this way, you can play your favorite programs, feature films or home movies again and again.
The advantage of this process is that you can edit your videos after you import them. If you just want to convert existing videos, using the batch converter is easiest. Here you select the target format and a storage location and then simply start the conversion process.
In the following, we'll show you all possible options, step by step.
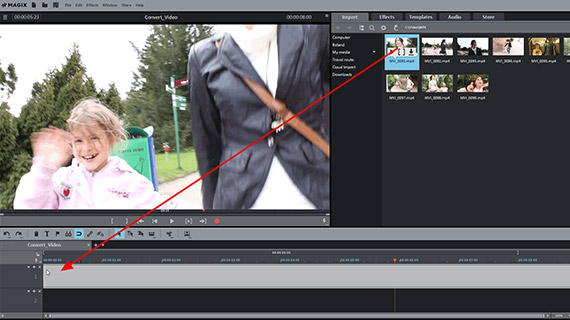
Step 1: Import video
- Open Movie Studio and import the video that you want to convert.
Above right in the Media Pool, open the folder containing your video file. Drag and drop the video file into the program.
The software will ask you if you want to copy the file to your hard drive before importing it. We recommend doing this, since editing files on your hard drive is faster and safer.
The video will then appear in the top track.
Step 2 (optional): Edit video
At this stage you can already change the video format and go straight to "Step 3" below. However, it'a good idea to check whether you're happy with your video material, or want to optimize or edit it first.
Make sure to check the beginning and the end of your video. Need to create an intro or outro? A range of impressive intros and outros with music can be found in the Media Pool under "Templates".
When you film your own video, the beginning of the footage can often be quite choppy, but this can be removed. For films or an episode of a TV series, you might want to skip the intro or remove commercial breaks.
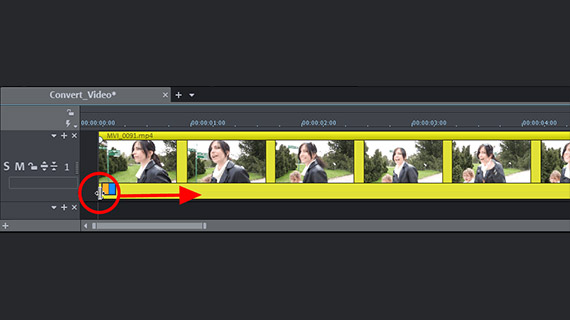
You can use the handles on the ends of each video object to trim them. This lets you remove the beginning or the end of the video.
You can also do this by positioning the playback marker where you want to make a cut and clicking the Cut button in the toolbar. Cut passages can then be deleted from the project window using the Del key. And don't worry – your original video file remains unchanged on your hard drive. All cutting processes in Movie Studio are "non-destructive".
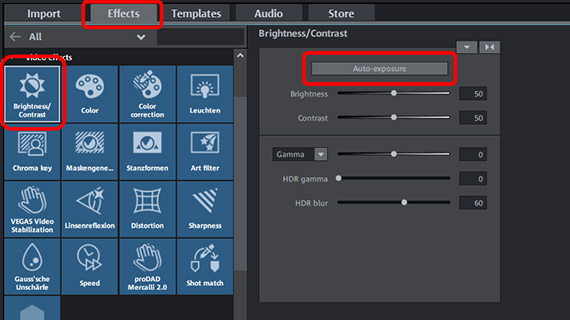
Evaluate if the image and sound quality of your video is high enough or whether any optimization or additional effects are needed before you convert the video. Unsure? Open the Effects tab and simply play around with the range of effects in Movie Studio. If you change your mind about an effect you've applied, you can undo it with the shortcut Ctrl + Z. To improve the picture quality, we recommend using the fast and easy auto-exposure optimization under "Brightness/Contrast".

Step 3: Change video format
First, find out which format is necessary for your playback device (by checking the documentation or manual, for instance). If you're not sure which format to select, MP4 (MPEG-4) is usually a good choice.
- To create a single video file which contains all of the footage in the project window, go to "File" > "Export movie". You'll see a list of video formats available in the submenu. There is a range of more specific settings for all formats available in the Export dialog. The MPEG-4 container format uses the H.264 video codec and the AAC audio codec. Both of these codecs can also be customized.
- Give your video file a name and select a location on your computer to export it to.
You've now converted your video file and can access it in a different format.

Changing video format for multiple videos
As already mentioned, you can process several videos together in one go, either to combine them all in a single file with a new video format or to change video file type for each file.
- The simplest way to convert finished videos directly into separate files is to use the batch conversion option from the File menu. in the dialog, select your source files, set a target format, define codecs if necessary and start the video file converter process. It doesn't get any quicker and easier than that.
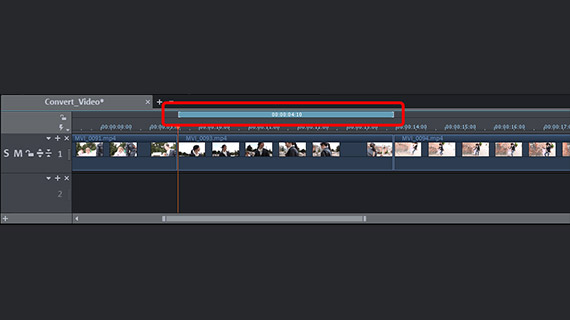
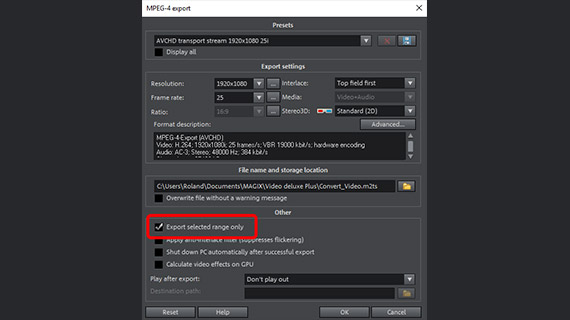
- In case you want to edit or optimize files beforehand or want to combine several video recordings, you should load the files you need into a single project. Hold down the Ctrl key in the Media Pool and click the videos you need one after the other. Then drag and drop the files together onto the track.
- You now have a project with multiple videos arranged in sequence. If you want to export a video, or certain scenes from a video, as a separate file, set a playback range above the video or scene. You can simply use the mouse to do this: a left click above the timeline sets the start of the range, a right click sets the end. The range will extend as a blue bar between these two positions. This range can be played back separately using the corresponding buttons on the preview monitor – in this way, you can control the range.
- Once you're happy with the range you've created, open the menu "File" > "Export film" and select a video format from the submenu. In the export dialog, activate the "Only export selected range" option. This way, you can export the ranges from within the project. If this option is deactivated, the entire project is exported in a single file.


