Create a holiday video
Follow these steps to create your own exciting vacation videos:
- Don't just shoot the main tourist highlights, but as many different shots as possible to create context – such as your companions arriving and departing, planning, outfits, gear etc.
- Open Movie Studio Platinum and import your film material. You can simply drag & drop to move the video files into a new project.
- Sort the videos on the track to create a clear storyline for your film.
- Cut unnecessary passages by setting the playback marker and pressing the "T" key at the cut positions. Delete the unnecessary part from the track and move the remaining sections together to close any gaps.
- Enhance the quality of your vacation video by using effects from the Media Pool. Use the auto exposure function to optimize brightness and contrast. "VEGAS Video Stabilization" is a powerful tool for turning choppy, distorted footage into smooth video. With the "Audio Cleaning" option, you can remove unwanted noise interference from the audio track and enhance the clarity of speech.
- Make your vacation video shine with extra details. Background music and sound effects can be easily dragged to your project from the Media Pool. Title templates are also included for creating professional title fade-ins, as well as intro templates for the beginning of your video. The travel route animation feature enables you to create a little video where the route of your journey is depicted on a map.
- Switch to the "Burn" interface, choose a menu layout and burn your holiday video to DVD or Blu-ray Disc. Alternatively, open the "Finish movie" dialog and export the holiday video as an MP3 or other type of file, or transfer to smartphone. This way, you can show your videos to others at any time, from anywhere.
Create holiday video with Movie Studio, the video editing software for downright amazing movies:
- Import for all conventional formats
- Intuitive editing tools for image and sound
- Image editing with auto exposure, color correction, slow motion/time lapse and video stabilization
- Audio editing with noise removal and equalizer and compressor for increasing speech clarity
- Travel route animation, sound library, license-free background music, opening and closing credits and lots more.
- File export as MP4 or other formats, burn to Blu-ray Disc or DVD, transfer to smartphone
Movie Studio:
The ideal program for creating holiday videos
Holiday videos are the best way to capture memories from the best times of the year and share them with family and friends. These days, most people own a decent camera or smartphone that can create high-quality video recordings. But even the best camera won't automatically produce a good holiday video. What you need for that is a few ideas, interesting subjects, a wide range of perspectives, and a high-performance vacation video maker.
A sequence of photos from your camera just isn't the same as an entertaining holiday film. Choppy footage, unusable or boring passages, darkly lit or overexposed videos, noisy audio – due to common issues like these, editing raw footage from your camera is almost always necessary if you want to create a great holiday video.
Video editing software Movie Studio is the ideal tool for this task. It's fairly priced, easy to use and offers a ton of professional functions and effects for cutting, video stabilization, image editing and noise removal. With all this, Movie Studio offers editing that is far superior to that in a free app. After you finish editing, you can transfer the holiday video you've created directly to a connected smartphone, upload to a web platform like YouTube or burn to DVD or Blu-ray Disc.
Keep reading to find out step-by-step and in detail how to create the perfect holiday video – starting with holiday video tips To start off, we outline tips for filming a holiday video. We then show you how to import material into Movie Studio, cut and optimize it, and produce an exciting vacation video. Finally, you'll learn how you can burn your holiday video to disc, transfer it to smartphone or upload it to the Internet.
Holiday video tips – filming
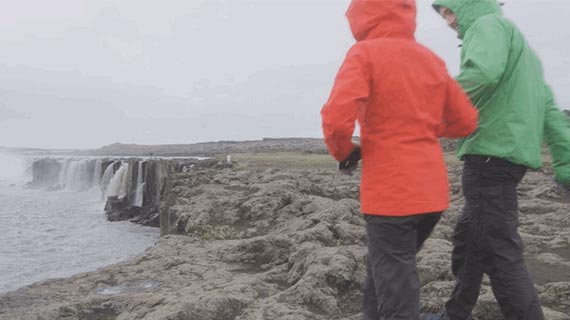
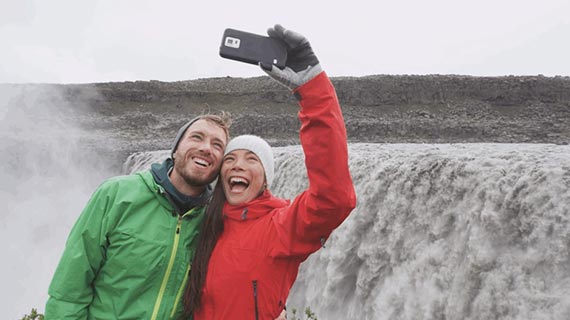
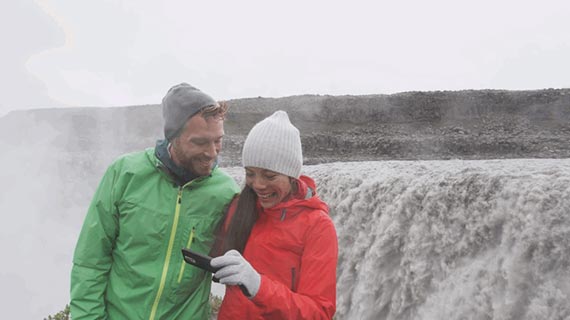
Many holiday videos only focus on the main tourist sights instead of the winding roads that led there or the curious side streets that you encountered on the way. It's nice to see a panning shot from the top of a mountain or other landscape. But ten of them in a row can get a little dull. If you really want to make an interesting film that people will remember, it's better to think of footage of the main tourist spots as highlights in your movie, and then bridge these scenes with other material for your viewers.
So for instance, you can use footage of everyone planning that day's adventure or scenes that depict the mood as you set out to your destination that morning. Place the main film highlights within a narrative framework and feel free to correct the sequence of scenes after the fact, if you need to. You're aiming to make an interesting film rather than a documentary that's 100% authentic, after all.
For filming your vacation footage, we also recommend the following:
- Start footage each day of the holiday with a new scene that gets the viewer's attention – be it a sunrise or having breakfast together at the table...
- Show your travelling companions on-screen. They're the protagonists of your vacation video and are what make it interesting and relatable. Try to captures their emotions, excitement and reactions to things, or you could even spontaneously interview them, if they're okay with it.
- Use the "shot/reverse shot" technique lots. Film your group as you set out towards your target destination for the day: For instance, start with an interior shot of the front hotel door and then an outdoor shot that shows the group coming out of the same door.
- Show all actions in their entirety where possible. So for example, when a door is opened, show the person going through it and then closing it.
- Find things that show the transition between the different stops on your journey – show schedules, plans, people setting off for the day etc.
- Establish a new location with a long shot so that your viewers can get their bearings when they watch the video, and aim for as many detailed shots as possible.
- Only film at eye level and seek out unusual perspectives e.g. viewpoints. Crouch down to film at a lower angle.
- Bring the camera around slowly and quietly and only film either horizontally or vertically in portrait mode (not diagonally, for example).
- Film travel scenes in the car, bus or train and include shots of the interior as well as the view out the window.
- Include your fellow travelers in your footage and film them from the side as they walk down the street. Walk in front and film them as they move closer towards you, or fall back and film the group as they move towards their destination – you can use the shot/reverse shot technique here too.
- Include your fellow travelers in your footage and film them from the side as they walk down the street.
Create a holiday video – Post-production
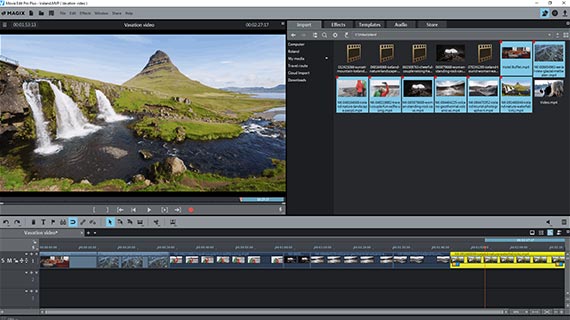
Create a holiday video: Import
It's journey's end – you're back home and want to produce a great holiday video from your film material.
You can do this in the following way:
- Copy all recordings to your computer's hard drive, preferably to a separate vacation video folder. You can compile holiday videos from any device in all common formats, and you can use holiday photos or scanned images too. Insert the memory card from your camcorder or camera into the card slot on your computer and operate it in the same way as a hard drive. Connect your smartphone with the computer and transfer recordings your made using your smartphone to the vacation video folder too. The more material you gather, the better.
- Open Movie Studio and create a new project using the Start dialog.
- Load all the recordings from the vacation video folder to the project. Drag and drop the files onto the tracks. When importing, try to import files in the correct order.
At this point you should decide in which order you want to show your recordings. Chronological order is usually best for a holiday video, so you can start with the first day of the trip and import all the material for that day. Then, add the material for the second day of the vacation, and so on.
But you can also decide on a different order, for instance organize the film according to theme. So if on some days you visited a city, while others were spent on the beach, you could separate your recordings of the city streets and the seaside into different blocks.
If you have created a large amount of recordings, you could think about splitting off sections for a separate, independent movie. Create a range of films for your Movie Studio vacation project and then burn all the films together to a single disc. You can then present your travel experience in the form of several films – for instance one based on the city and one for the beach – that you can quickly jump between via the DVD menu. Additional films for the same project can be created under "File" > "New movie" an.
Holiday video editing: Rough cuts
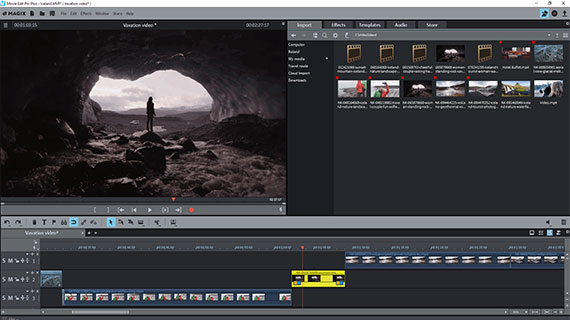
You've now imported your video material into Movie Studio. In the first track, you will see lots of little clips. This is the stage where you need to create a rough structure for the material and rearrange things to tell the story of your voyage.
Each story is told through sequences. Each of your sequences can be split up into smaller parts – scenes. And each scene usually includes several shots to create a beginning, middle and end.
That's the theory, anyway. In practice, it means you have to go through your footage to pick out individual sequences and separate them from each other. When doing this, it's best to remove parts you don't want to use from the project entirely. You will probably come across these – any vacation video maker will end up with extra footage that was accidental.
Go through the material and cut parts that are clearly unusable.
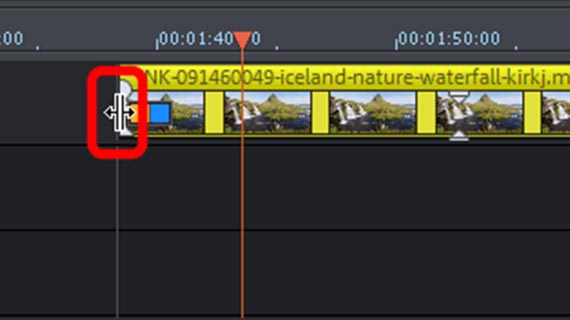
- Place the playback marker at the beginning of the part you want to cut and press "T" on your keyboard. The vacation video will be cut into two parts. You can then delete the part that can't be used from the track. If you haven't cut it in exactly the right place, it doesn't matter: Drag the passage you accidentally cut out of the remaining video object. Move the mouse pointer to the object border until it turns into a double arrow. Click and drag the cut video object together while holding down the mouse button until it starts and ends at the right positions.
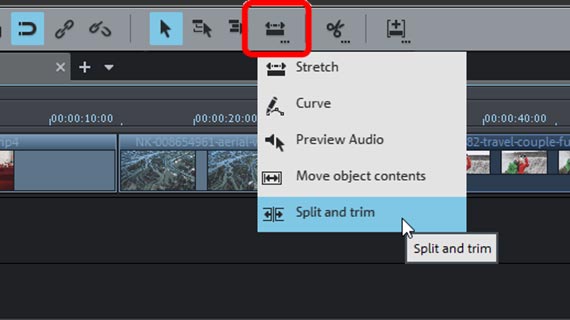
- Alternatively you can right-click the Mouse Mode button and in the context menu, select "Split and trim". Then drag the mouse to the right over the video object while following the corresponding video images in the preview monitor. Continue to scrub through the material quickly. If you find a passage that needs to be deleted, click on the correct position. This cuts the holiday video. Then, continue to drag the mouse to the right to find the next cut. When you have set all cuts, switch to the normal "Stretch" mouse mode in the context menu and delete all the unnecessary sections from the track.
- When you delete material, a gap will appear on the track. Don't forget to close gaps by dragging the following objects to the left. To do this, use "Mouse mode for single track". This will automatically drag all videos to the left.
Create a holiday video: Optimizing image and sound
Sound and image problems are often an issue in spontaneously recorded holiday videos. When you have sorted out the various sections of your journey, you can optimize both image and sound quality at the same time. Because it's been filmed under the same conditions, the same image and audio issues are often present across a single video sequence.
- If one section contains many videos, you can move all related videos to separate tracks. Holding down the shift key means that when moving videos onto a different track, the horizontal position remains the same.
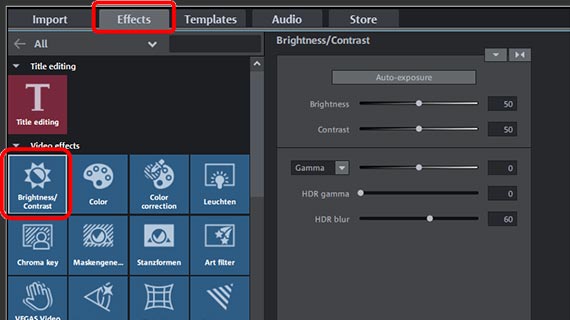
- Mark the first video object and open the "Effects" tab in the Media Pool.
- We recommend you start with the effect "Brightness & contrast". There are a number of faders for basic image properties brightness, contrast and gamma. The "auto exposure" button sets parameters automatically following analysis.
- It's often a good idea to also correct the color of your footage, since all three of the color correction parameters – color, brightness and contrast – work together to define how the video picture looks. Click on the "Color" icon to open the color dialog. Here, you can remove tint, for example. In the Plus version of Movie Studio, an additional effect dialog is available for secondary color correction: "color correction". This allows for colorization of the foreground and background to make specific objects in the picture stand out from each other.
- The effect tile " VEGAS Video Stabilization" offers powerful 1-click video stabilization, which turns shaky footage into smooth video.
- Use the "Speed" effect to slow down camera pans that are too fast, or vice versa, to accelerate shots that are overly long.
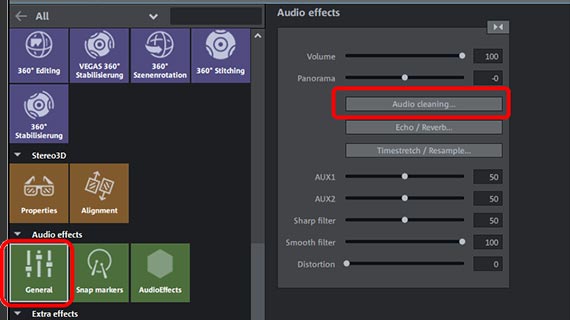
- In the "Audio effects" effect dialog, the "Audio Cleaning" option opens a comprehensive editor for removing background noise with DeNoiser, DeHisser and DeClicker, as well as an equalizer and compressor. This lets you remove unwanted noises from the audio track and improve the overall sound quality of your footage.
- To apply the current effect settings for the video object to all videos on the track, click the triangle button in the upper right-hand corner of the effect dialog and select "Apply video effects to all of the following objects". You can then choose which of the effects you want to apply to the other objects.
Holiday video editing: The final product
Now you're ready to bring your holiday video into its final form. Makes sure to take note of the following:
- Arrange shots and work using "contrast cuts". This means you juxtapose contrasting cuts that are related to each other. These could be a pair of shot/reverse shots, or contrasting scenes that stand out as a match when you're editing the material afterwards.
- Go "with the flow" when cutting within a scene, so that jumps to a contrasting cut aren't so noticeable. So for moving subjects, cut before the end of the movement – don't wait until the end.
- Avoid gaps. Cut the footage before the main person you're filming has left the scene entirely.
In essence, you want to connect scenes as much as possible and smoothly too, to create continuity and make your video more compelling: The material should be structured in the form of a story that the viewer wants to follow.
Focus on the following questions during editing:
- Where should the camera shots be cut?
- Where can I create a contrast cut?
- How many cuts can be made in a scene without it coming across as too hectic?
- How long should a scene be in total, so that viewers don't get bored?
These questions shouldn't be dismissed. It all depends on your material and the context. And there are lots of new editing options being added to the program all the time – so play around and get creative. With time, you'll get the feel for editing footage so you know where's best to make cuts and how you should pace them.
Adding sound to your vacation video
The audio track of a holiday video often can't be used, because it features noise, background sounds, wind noise or rustling. As a solution, you can replace this in parts with music. We suggest you combine different pieces of music for this, and only use short extracts rather than the whole song. Choose music that works well with the video and enhances its atmosphere or mood.
Remember, however, that you're making a vacation video, not a video clip; so leave sections without music too. In sections without music, don't remove the noise in the audio track fully – just decrease its volume. Passages that are totally silent may come across as jarring and unrealistic, while a little background noise really makes the scene feel more authentic.
If you are only planning to share your video with family and friends, you can use any music you wish. But if you're presenting it online or in any other public way, things are different. In this case, there are legal implications when you use copyrighted music – you need to get the owner's permission.
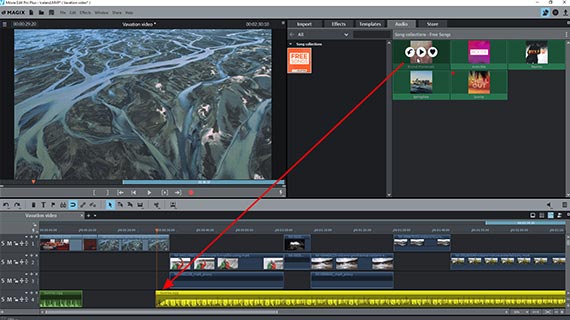
To be on the safe side, you can just use free music that isn't copyrighted. Movie Studio includes free music that's perfect for your video – simply go to the "Audio" tab.
Select a section of your holiday video to which you'd like to add a musical background, then pick music to match.
To cut the audio track separately, you need to make the corresponding audio objects visible.
- Select the option "Audio functions" > "Video/Audio on separate tracks" in the context menu.
The audio track now appears as an independent audio object, although it's still grouped with the image track.
- Select the corresponding button on the toolbar to ungroup it.
You can now edit the audio track separately and select the natural sound from the film recording that you want to use. Which sounds from the original recording should you keep in? Keep all the sounds that are relevant to the visual content – for instance the rushing noise of an incoming subway train or the click-clacking of shoes on the pavement.
Want to add extra sound effects? Via the "Store" tab, you can access "Sound FX" collections which can be purchased at a low price and used in your holiday video – they're great for adding that extra touch!
Add subtitles and opening credits to your holiday video
Changes of location that cannot be explained by the action in the film can be explained by title transitions. These fade-ins also are good for providing your viewers with extra information about the holiday location, for instance.
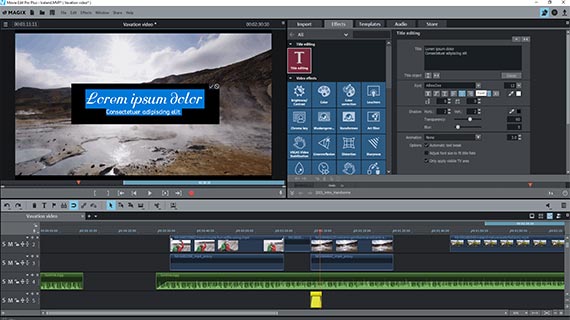
- Open the "Templates" tab and look for a suitable title template. Drag the title to a free track and move the title object to the right location.
- Type the text for the title into the preview monitor.
- Position the title on the preview monitor.
- If you want to change font, use the title editor in the Media Pool.
Tip: For longer text, it's often useful to add a few titles in a row to present the info in several sections.
While you're doing this, you could add opening credits too:
- To create space for opening credits, switch to the mouse mode for all tacks and drag the first video object to the right. This mouse mode ensures that all following objects are grouped and moved together, so there are no problems in the following images.
- Choose which videos or photos to display during the opening credits and place them at the beginning.
- In the title templates, select a template for opening credits and drag it to the beginning.
- Add text to the template in the preview monitor.
- If you'll like to add background music to the opening credits, drag a music file to the track below them.
Create a holiday video with travel route animation
- To create a travel route, go to the Media Pool and open "MAGIX Travel Maps".
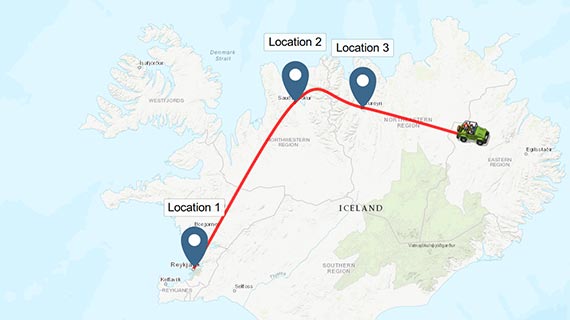
MAGIX Travel Maps is an add-on for creating entertaining animated travel routes. This lets you show your viewers who went on the journey and how they got around on different stages of the trip.
After opening MAGIX Travel Maps, you will be presented with the map selection. This is where you'll select a map to create your animation. You can choose from topographic maps with terrain details, photographic maps from satellite images or artistic maps.
Here's how it works:
- Use the mouse wheel to scroll through the selection list. To select a map for your animation, click on it.
- Each travel route consists of individual destinations which act as waypoints on your journey. Simply click with the mouse to set a destination on the map. Each destination can be assigned an individual name, and you can also delete destinations.
- To move a destination on the map, move the mouse onto the destination until the mouse pointer turns into a double arrow. Now click and move the destination freely.
- Destinations are automatically linked by a line. This line represents your travel route. You can play the animation by clicking on the playback arrow.
MAGIX Travel Maps offers a wide range of additional options for adding fun and variety to your travel route animation:
- Under "Path & Avatar" you can customize the appearance of the route, change the avatar (i.e. the little vehicle that you see moving along the route) or modify the destinations. You can select one of the symbols provided or add your own photos.
- If using a real map, you can set destinations by entering an address. Use the "Search" field for this. Maps such as these also support the use of GPX data from your phone.
- When you're done making changes to your animation, click "Finish". A new WMV video file containing your animation will be generated. You may now insert the video file anywhere in the vacation video.
Export or burn a holiday video to disc
Once it's finished, play back the entire vacation video from start to finish to make sure you haven't left anything out.
If you're happy with the results, you can burn your creation to disc or export it as a video file to your smartphone.
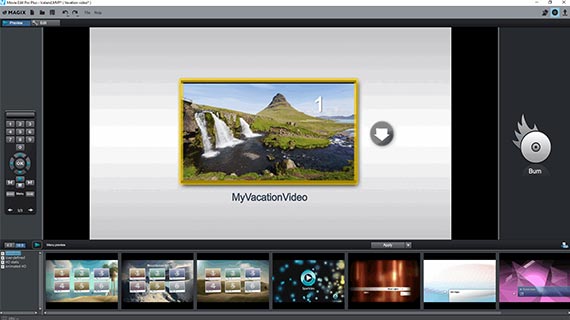
- Burn to disc: DVD, AVCHD and Blu-ray Disc are all available. To open the "Burn" interface, click to the right on the button with the disc icon. Here you can select a menu template or lay out the elements from your holiday video using a custom selection menu. Then burn the holiday video to create a disc that features its own selection menu and can be watched on any standard DVD player.
- Export video file: Under "File" > "Export movie" you can export your holiday video as an MP4 file or another format. Choose a preset in the export dialog or adjust the encoder settings manually.
- Upload to the Internet: Vimeo and YouTube are directly connected to the program. A click of the mouse is all it takes to upload your new, enhanced video to your account. Click on the arrow symbol in the top right to open the dialog "Finish movie".
- Transfer to smartphone: In the "Finish movie" dialog you will see the option "Export to mobile device". Here you simply pick a device, Movie Studio sets the parameters automatically. If your smartphone is connected to your computer, the holiday video will transfer directly to it once file export is finished.


