Simulate tilt shift – here's how!
To use tilt shift to turn a video into a toytown world, follow these steps:
- Open Movie Studio Platinum and drag & drop a video from the Media Pool to import it.
- In the Media Pool, click on "Effects" and then open the "Sharpness" effect dialog.
- Drag the slider for "Artistic blur" to the right. The entire image now appears blurred.
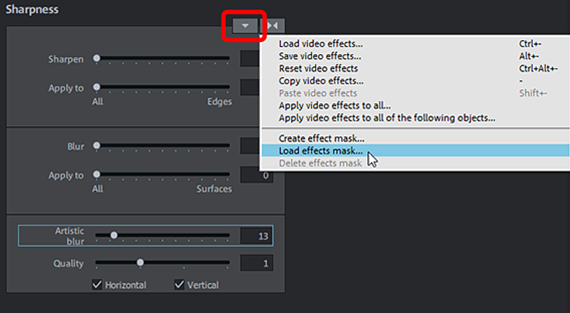
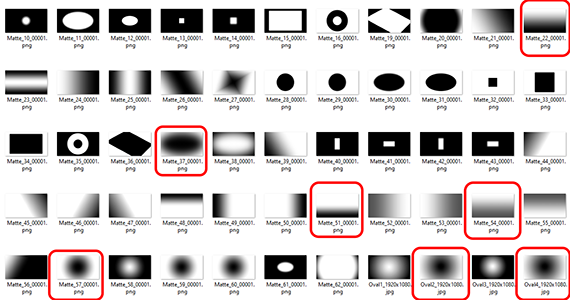
- Above right, click on the button with the arrow to open the effect menu. Select "Load effects mask". The sub-folder that opens contains a range of effects masks that you can use for the tilt shift effect. The idea is that the dark areas of the mask block out the blur effect. The image stays in focus in these areas. The best masks for simulating the tilt shift effect are masks that are dark in the middle – this means the subject in the center of the image stays sharp.
- Choose a mask and then click "OK". You can try out different masks, and just press Ctrl + Z each time to undo your action. Load several masks in this way and compare the results to find the right one for your project.
- You can use other effects to enhance the effect further and really create an impression of a miniature model landscape. Open the effect dialog "Color" and increase saturation for the image. You can enhance contrast using "HDR Gamma" in the effect dialog "Brightness/Contrast". You could also apply a simple time lapse effect. Open the "Speed" effect dialog and move the slider to the right.
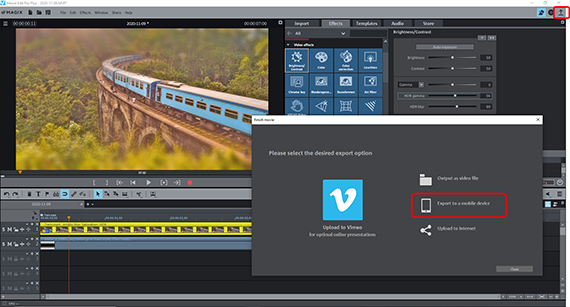
- Once you're happy with the tilt shift effect, go to "File" > "Export movie" and select an export format in the sub-menu (e.g. MP4). You can also burn the video to DVD or transfer it to your smartphone. To do this, use the buttons in the top right corner of the program interface.
Dubbing audio to video using Movie Studio, the video editing software for downright amazing movies:
- Import all common audio and video formats
- Custom volume control via object handles
- Audio mixer for multiple audio tracks
- Increase volume using audio effects (normalization, compressor, 1-click effect templates)
- Mastering with multiband compressor for professional volume editing
- Track curves for dynamic volume control
- Helpful program wizards
- File conversion into all essential formats, CD burn function and direct transfer to smartphone
Tilt shift effect:
Create a miniature model of the world
Tilt shift is a popular special effect that creates an imitation of a miniature or "toytown" world using real-life photos of a landscape or city scene. This look is usually created by applying an artificial blur, the kind that can occur in close-up shots. When your camera lens is focused on a close, small object, for instance the locomotive of a model train set, the resulting photograph will feature a large depth of field. The means that parts of the background appear blurred. In real-life landscape photos, however, the relationship of distance between the subject and the camera lens is completely different, meaning that picture sharpness is uniform.
While sharpness is the crucial aspect of the tilt shift effect, other image properties are characteristic of tilt shift miniature scenes. Miniature models are usually located in well-lit indoor locations, so the lighting conditions are different to outdoors. To simulate artificial illumination, it's recommended to also increase saturation and image contrast for the tilt shift effect to reinforce the impression for the viewer that they are looking at a model world.
You have an extra option if you're creating a video: In a toytown world, movements are sometimes artificial and not true to life. A model train often runs a lot faster than a real one. If applying the tilt shift effect to a real-life video, a simple time lapse effect can really enhance the effect of a toytown world even further.
For great tilt shift results, it's all about having access to various effects and applying them separately. And this is what a comprehensive video editing program such as Movie Studio Platinum offers. Movie Studio Platinum delivers all the creative options you need to simulate tilt shift in your videos and transform video recordings into impressive miniature landscapes. What's more, Movie Studio Platinum lets you apply the tilt shift effect to photos and even create still photos with tilt shift from video recordings.
Despite its wide range of features, Movie Studio Platinum is easy to understand and a breeze to use. Keep reading for a practical step-by-step guide to creating tilt shift with Movie Studio Platinum.
Apply tilt shift using Movie Studio Platinum
How to tilt shift:
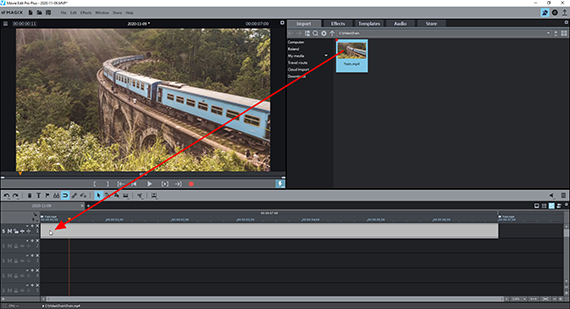
Importing a video into the program
- Load the video that you want to turn into a toytown world.
To do this, navigate to the folder containing your video in the Media Pool in the top right section of Movie Studio Platinum. Click the file and, while holding down the mouse button, drag and drop it into the project window.
Panorama shots of a landscape or a cityscape taken from the same distance work best. Classic "toy" subjects in the photo, such as a railway or a building site, can really enhance the tilt shift effect.
Tip: You can also import photos into Movie Studio Platinum and apply the tilt shift effect to them. In this case, you load a photo file in JPEG or PNG format as described above. You then edit the photo in exactly the same way as a video, with the exception of the time lapse effect, which can't be used for stills, of course.
- To play the project, press the spacebar.
The red playback marker will move from left to right through the project window and can be moved by clicking the timeline above the track section.
- To stop playback, press the spacebar again. The playback marker will jump back to the position it was in when playback was started.
If you only want to use tilt shift for a certain scene in your video recording, set the playback marker to to the location where the tilt shift passage should begin and press the T key on your computer keyboard.
The video will then be cut at this position. Cut again at the end of the passage and the scene will become a separate video object.
Tilt shift effect: Creating artistic blur
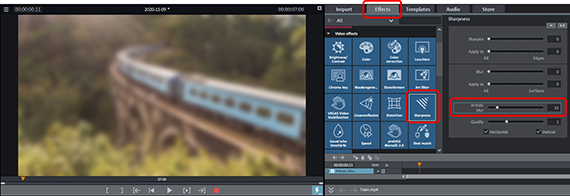
The tilt shift effect is mainly achieved by blurring parts of the image. First of all, you need to blur the entire image and then apply an effects mask.
- Click on the video object in the track that you want to apply the tilt shift effect to.
- Place the playback marker in the range above you selected video object.
When working with an edited video, this lets you make sure that the image displayed on the preview monitor is from the selected scene.
- In the Media Pool, open the Effects tab and click on the "Focus" tile.
- Drag the slider for "Artistic blur" to the right – but not too far. A value between 10-16 should do the trick.
The video image in the preview monitor will now appear blurred.

Tilt shift effect: Applying an effects mask
- In the dialog above right, click on the button with the downward pointing arrow to open the effect menu.
- Select "Load effects mask".
- Load an effects mask.
Effects mask are alpha masks that can be used for all image editing effects in Movie Studio Platinum. They work according to the level of brightness: the darker the area of the mask, the fainter the applied effect upon the image. In dark areas, the effect cannot be seen at all, in paler areas it is applied to the full.
For the tilt shift effect, using a mask with a dark area in the center of the image is best. These masks remove the center of the image from the blurred effect. When the main image object lies more in the lower half of your image, pick a mask that's black at the bottom.
If you want to try out several masks, the easiest thing to do is to undo the "Loads effects mask" step.
- Press Ctrl + Z to remove the mask you have just applied.
The mask will be removed and you will see the image as it was previously. You can then try out other masks until you get the desired result.
The effects masks can also be inverted. This means that the white and black areas are swapped, which broadens the mask options available.
- To invert a mask, click on the little arrow button on the mask object in the track.
Top tips: You can also create and apply your own masks. To do this, click the option "Load effects mask..." and in the effect dialog, load an image of your choice in JPG format and use its brightness values as an effects mask. Simple and clear brightness values are usually best. So for instance, you can draw a thick black bar with blurred borders in a graphics program, export the drawing as a JPG file and then load it as an effects mask in Movie Studio Platinum.
Next, ensure that the parts of the image that contain the main subject are not affected by the blue effect – you can do this by applying an effects mask.


Tilt shift effect: Additional effects
Partial blur is the most important aspect of the tilt shift effect, but you can also apply additional effects to create the impression of a toytown landscape.
By increasing saturation you can achieve more intense colors like those of plastic toys.
- Click on the "Color" tile and drag the fader to the right to increase color saturation.
Editing selective brightness and image contrast can also really help you simulate artificial indoor light.
- Click on the "Brightness/Contrast" tile and adjust values for brightness, contrast, HDR gamma and HDR blur. We recommend increasing the HDR gamma value, in particular.
The use of time lapse can also be very effective, even if you're not turning a train into a model railway in your video. Events in your video such as moving cars, pedestrians and drifting clouds will then appear with distortion when you apply time lapse, and this enhances the illusion of tilt shift.
- Click on the "Speed" tile and in the dialog, move the slider to the right to increase playback speed.
Export video or photo with tilt shift effect
Once you're happy with how you've used the tilt shift effect, you can export the finished product as a video or a photo:
- For a tilt shift photo, place the playback marker at the location in the video that you want to export as a still image. Go to "File" > "Export movie" > "Single frame as JPEG" or "Single frame as BMP". In this way you can create a photo file in JPEG or BMP format. You can view the result in the preview monitor.
- To export a video with tile shift effect, go to "File" > "Export movie" and select an export format in the sub-menu, for example a "Quicktime Movie" (MOV) or "MPEG4" (MP4). In the export dialog, you can define that you want to export the selected range only. The range can be dragged out above the timeline using the mouse. You can also export short video clips with tilt shift effect in this way.
- You can also transfer your rotated video directly to a connected smartphone, upload to a social media platform or burn to disc. The options for this can be opened by clicking the buttons in the upper right-hand corner of the program.


Tilt shift with Movie Studio Platinum, the video audio editor for downright amazing movies:
- Import & export for all relevant formats
- Quick cut & detail cut
- Automatic wizards
- Up to 900 effects & music
- Intuitive templates for intros, outros, subtitles, transitions, opening credits and much more
- Burn videos to DVD & Blu-ray (and design your own menus)

