Learn how to Create a Split Screen!
Here's how to make a split screen video with multiple video objects:
- Start Video deluxe Plus and drag & drop to import the first video from the Media Pool onto Track 1, the top track. Drag all other videos into separate tracks below. These videos will cover the videos on the tracks above.
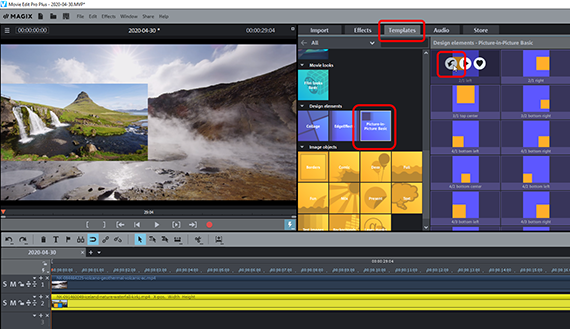
- Click on the lowest video. Open the "Templates" category and click on the "Picture-in-Picture Basic" templates folder. Using the template icons, you will be able to see how the video will be positioned in the frame. Place the mouse over the appropriate template and, in the pop-up window, click the button on the left. This will shrink the selected video and position it inside the frame.
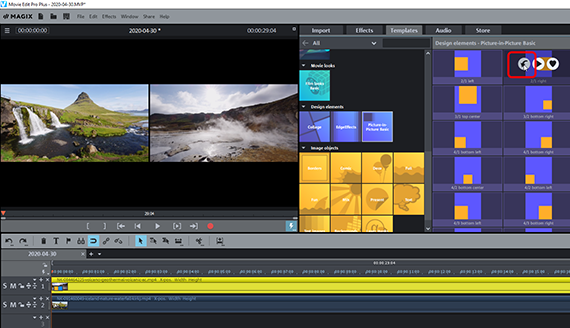
- Repeat this step for the other videos. Select a different template for each video. Work from bottom to top so that the selected video is not covered by other videos. This way, all videos will be scaled down and arranged into a split screen according to the corresponding template.
- If you wish to adjust the split screen later, select the effect "Size/Position" under "Effects" in the Media Pool. Click the preview picture in the preview monitor to move a video. Drag on the corners of the frame to change the frame size. This allows you to change almost every conceivable aspect of the split screen's position.
- Once you're happy with the split screen effect, go to "File" > "Export movie" and select an export format in the sub-menu (e.g. MP4). You can also burn the video to DVD or transfer it to your smartphone. To do this, use the buttons in the top right corner of the program interface.
Split screen video maker using Video deluxe Plus, the video editing software for downright amazing movies:
- Import all conventional video, photo and graphics formats
- Individual split screen templates
- Design your own split screen and arrange videos freely within the frame
- Crop widescreen material and specify the displayed section
- Enhance split screens using subtitles and graphics
- Helpful program wizards
- Convert files to all essential formats, upload videos to the Internet, burn them to disc, and transfer them to your smartphone
Split screen video: How to divide your screen into several videos playing at the same time!
A display will be divided into several areas with a split screen video in which different video clips run simultaneously. This allows products to be compared with each other, for example, or events to be viewed simultaneously. The viewers must link the information and they are given an added dimension in the process.
Split screen videos are easy to produce. You need several video files, which should be presented together in a split screen, and a split screen video editor, which combines the videos into one image.
On this note, it's better to avoid relying on a specific position for the image. While these preconfigured split screens are a practical way to save time and effort, they might not fit in some cases. It's possible that you would like to create a specific split screen layout, but cannot find a suitable template for it. For example, with video material in 16:9 widescreen format, it often makes sense not to use the complete frame, but rather insert a suitable section into the split screen. So it's important to be able to crop the picture. And perhaps you will also want to add subtitles to your split screen, so that one can read what is happening in the different areas. Or even additional overlays, for example, an animated arrow graphic or a frame marking a selection?
There are a wide range of options available, particularly for more advanced split screens. Video and audio editing software Video deluxe Plus lets you make full use of them all. The program includes a huge collection of 1-click templates, a well as additional options for creating your own split screens. MAGIX Video deluxe Plus offers everything you need for advanced video editing: Extensive editing features, audio and video enhancement, video effects, audio track editing, subtitles, animations, overlays and much more. All together in a straightforward and coherent software environment.
Our step-by-step guide below will tell you everything you need to know about creating various kinds of split screens with Video deluxe Plus.
Create split screen videos with Video deluxe Plus
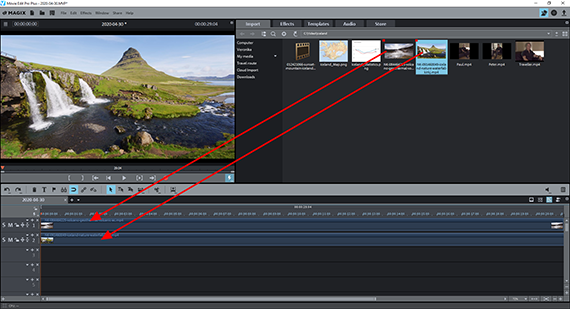
Split screen video: Importing videos
- Start Video deluxe Plus and create a new project using the start dialog.
- Open the "Import" tab in the Media Pool, navigate to the folder which contains your video files.
- Drag each video in the Project window onto a separate track so that all the videos in the Project window are below one another.
Tip: Of course, you can also insert photos or graphics to make your split screen. All types of media can be freely combined on all tracks. The process is always the same.
If you want all the videos to fade in at once, position the videos in the tracks so that they all start together. If you want to fade in the videos in the split screen one after the other, place the beginnings behind each other accordingly.
Apply split screen templates
- Click the video in the lowest track to select it.
- Open the "Templates" in the Media Pool and click on the "Picture-in-Picture Basic" icon.
The picture-in-picture templates have pre-configured settings for image position and size, so that videos can be made into a split screen.
- Place your mouse cursor over a template to open a little pop-up window.
- In the pop-up window, click the button on the left with the downward-facing arrow.
This will shrink the video and position it inside the frame. In the margins, the video on the track above will be shown.
Then to try out another template, press the keyboard shortcut Ctrl + Z to undo the previous settings. When you've found a template you want to use, place your mouse cursor over the next template and, in the pop-up window, click the button on the left with the downward-facing arrow again. In this way you can "search through" the entire template folder to find a suitable template.
The templates are arranged, so that altogether they result in a split screen. Template combinations stem from their designations: Template "2/1 left" matches template "2/1 right". Both templates can be used as two videos, that they display a split screen together. For two videos, choose the "2/1 left" template for one video and "2/1 right" for the other video.
The first number in the template's name indicates the number of videos that can be combined in a split screen video. The second number is a number to indicate the different variants from one another. For example, there are three different split-screens for four videos. The first variant consists of the templates "4/1 top left", "4/1 top right", "4/1 bottom left" and "4/1 bottom right". For this split screen, all four videos will be position using the same size. The second variant consists of the templates "4/2 bottom left", "4/2 top center", "4/2 bottom center" and "4/2 bottom right". In this split screen variant, the video is displayed such that the template "4/2 top center" is larger than the other three videos in the top area. The three smaller videos will be positioned next to each other in a row under the large video.
The corresponding size and position can be seen in the orange-colored icons. If in doubt, simply try the template to see where the video is positioned.
Even after you have edited all videos with picture-in-picture templates, you can change the split screen in a number of ways.
Adjusting a split screen
Widescreen video has wide black borders at the top and bottom. To make better use of the available image, it might be advisable to crop the videos. You should proceed as follows:
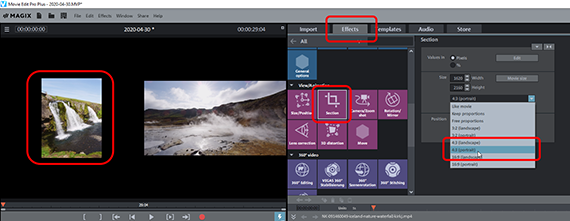
- Open the "Effects" tab of the Media Pool and select the "Section" tile under the "View/Animation" category.
- Select an aspect ratio in the flip menu of the effects dialog (e.g. "4:3 portrait"). Using the option "Free proportions", you can adjust the displayed section freely.
- If necessary, activate the option "Fullscreen".
- Hold down the mouse button and draw the cropped frame on the preview monitor.
- Check "Preview" in the effects dialog to check the results. To correct the cropped area, click on "Edit" and change the borders.
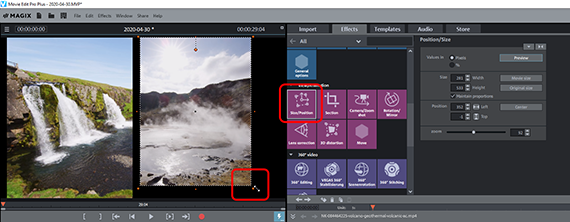
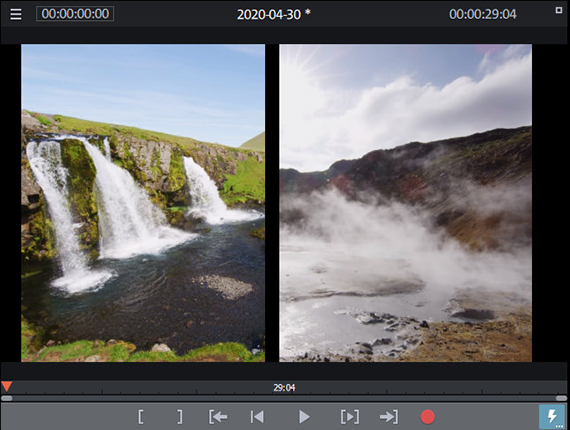
The very small cropped image will be displayed in the split screen. This is because the templates are working with the entire image. However, you can easily change the size:
- Click the "Size/Position" icon in the "View/Animation" effects category.
Using this effect, you will again see a frame around your preview view. Unlike the "Section" effect, this frame is used to reduce or enlarge the image.
- Drag the frame in the preview monitor to the desired size.
In addition to the size, we need to make some changes to the image position.
- Click on the preview image and drag it to the desired position.
This allows you to easily adjust all image sections, sizes and positions in your split screens.
Designing your own split screen
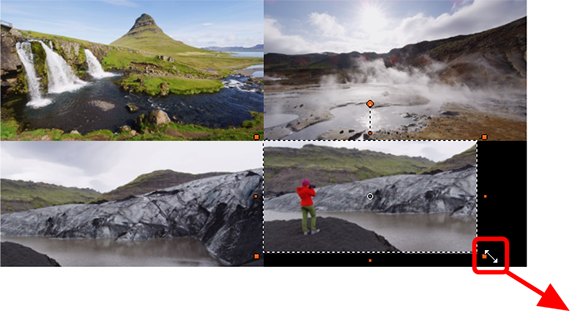
You can forego templates and design your own custom split screen. And then combine the video images directly in the preview monitor until the desired split screen results. The advantage here is that you don't have to search for the appropriate template.
- If necessary, you can remove all presets from the previous steps (right-click > "Video effects" > "Reset video effects").
- Select the video on the lowest track.
- Click the "Size/Position" icon in the "View/Animation" effects category.
- Drag the frame in the preview monitor to the desired size.
- Click on the small image and move it to the desired position in the preview monitor.
Your first video is now complete. Do the same for all other images. Arrange the images in the preview monitor until the desired split screen has been created. Work from bottom to top so that the image of the selected video is not covered by other videos. To align the images exactly, you can also use the numerical input in the dialog.
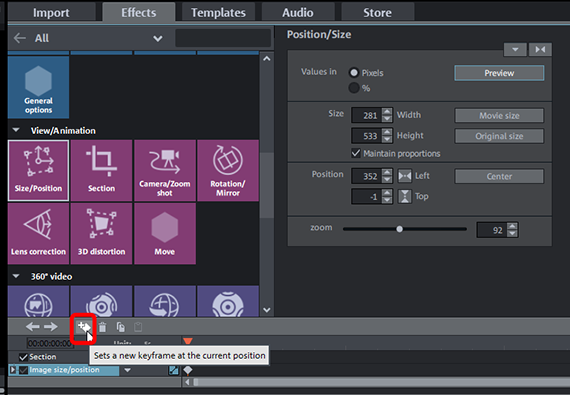
An elegant variation on this layout is to first create a normal split screen and then expand one of the videos to fullscreen. This is possible using keyframe animation in Video deluxe Plus:
- Design your first split screen.
- Select the video you want to "expand". Drag it to the bottom most track, so that image is on the top layer.
- Open the "Size/Position" effect and expand it, if necessary, until you can see keyframe animation at the bottom of the dialog.
- Place the playback marker at the position where a video should expand.
- Place the first keyframe.
- Place the playback marker at the position where a video should be seen in fullscreen.
- Click on the "Movie size" button in the effects dialog. This will automatically set the right keyframe.
Inserting titles into split screens
Often split screens need to be supplemented with titles to explain to the viewers what can be seen in the individual videos. This can be done using the black borders for fading in titles.
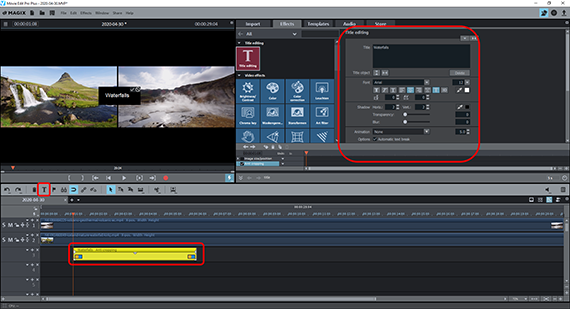
- Place the playback marker at the position where a title should be added.
- To do this, click the "T" button in the toolbar.
This will insert a title object into the video at the position of the playback marker, and the "Title editing" dialog will open.
- In the dialog, enter the text and formatting properties (font, typeface, font effects).
- Click in the preview monitor on the check button to close out entering the title.
- Click on the title in the preview monitor and drag it to the desired position in the split screen.
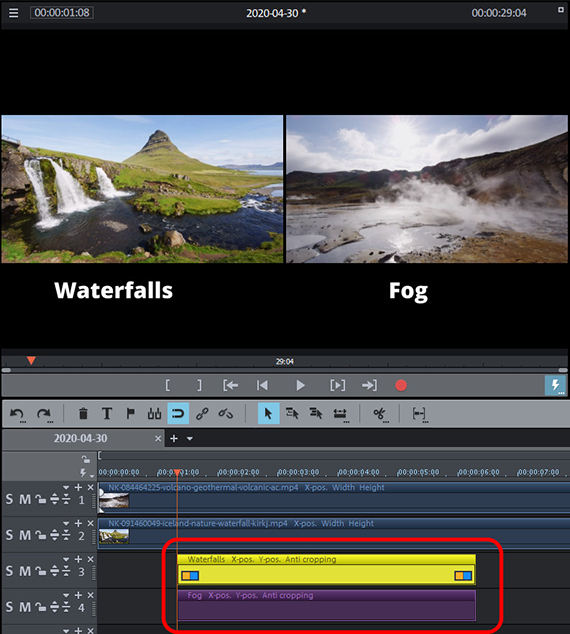
To add a similar title to another video, simply duplicate the title object in the track.
- Hold down the CTRL key, click the title object in the track and drag the mouse to create a duplicate.
- Drag the duplicate onto a separate track under the original.
Now both titles are placed in tracks under one another and are visible in the preview monitor.
- Click on the title in the preview monitor and drag it under the second video.
- Double-click on the title to change the text.
You can do this to quickly create your own subtitles for any video.
Alternatively, you can use the title templates in the Templates directory. Since these templates are for fullscreen videos, they will likely need to be resized. Here, it can be helpful to remove any preset position and size effects. Right-click the title object in the track and select "Video effects" > "Reset video effects". Then, you may reduce the size of the title template and move it within the split screen, as desired.
Adding overlays as a split screen
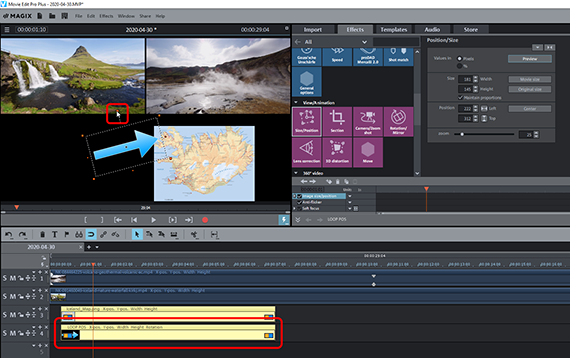
In advertisements, for example, split screens are often supplemented with additional overlays. For example, frames, arrows, crosses, check marks and other various graphic elements used for highlighting and drawing the viewer's attention to specific elements in scenes.
Video deluxe Plus offers a number of image objects for creating these types of overlays. But you can also use other graphics, if desired.
- You can find several image objects in the Media Pool under "Templates" > "Image objects", but primarily in the sub-folder "Presentation" here. Here, you can find informational symbols, checks, crosses, arrows and much more. To load image objects, simply drag them onto an object in a track.
- If you'd like to use your own graphics, you can access them in the "Import" tab of the Media Pool. Drag a graphic on to an open track under the last track in your project which has objects.
- Select the graphic on the track and open the effect "Position/Size".
- Click on the graphic in the preview monitor and adjust the graphic's position and size using the same method as before for the videos. Graphics can also be rotated, which can be useful for arrows, for example. To do this, use the rotation point inside of the frame.
- Adjust the duration the graphic should be show with the object handle in the lower corner. To do this, move the mouse to the lower-right end of the graphic's object until the mouse pointer turns into a double arrow. Now click and drag the hand to the right in order to lengthen the duration, or pull it to the left to shorten it.
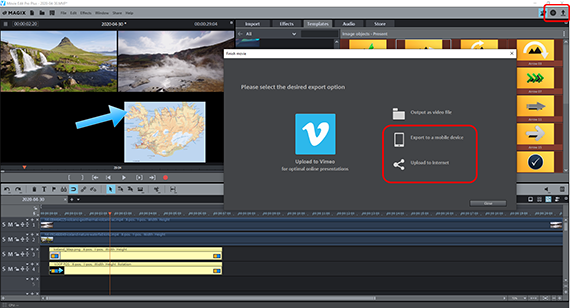
Exporting a split screen video
Finally, once you're satisfied with the split screen, export the project with all of it video content, titles and overlays:
- To export a video file, go to "File" > "Export movie" and select the desired export format in the sub-menu, for example a "Quicktime Movie" (MOV) or "MPEG4" (MP4).
- To render the project directly to your smartphone, upload it to a social media platform or burn it onto a disc via the Options in the upper right-hand corner of the program. Here, you will see the interface for burning discs as well as the dialog "Finish movie".


Split screen videos with Video deluxe Plus, the video audio editor for downright amazing movies:
- Import & export for all relevant formats
- Quick cut & detail cut
- Automatic wizards
- Up to 900 effects & music
- Intuitive templates for intros, outros, subtitles, transitions, opening credits and much more
- Burn videos to DVD & Blu-ray (and design your own menus)
- Only now for free in this offer:
- ✔ NewBlue Filters 5 Ultimate (£269 value)
- ✔ proDAD Mercalli V6 Plug-Ins for MAGIX (£269 value)

