Normalize audio using software – here's how it works!
To normalize audio in your video or edit volume, follow these steps:
- Open Movie Studio Platinum and drag & drop to import your video from the Media Pool. To combine several videos, drag them one-by-one to the top track and arrange them in the correct order.
- Right-click on the videos and select the option and select "Audio functions" > "Normalize (maximum level)". If you notice that there's a spike in volume, cut the passage that contains the spike by setting the playback marker before and after the passage and press the "T" key. The cut video objects can then be normalized separately.
- To increase volume further, use the compressor from the "Audio Cleaning" dialog in the Media Pool. This sets quiet passages louder automatically and levels them with louder passages. In addition to higher average volume, you'll achieve better intelligibility of speech.
- For even more editing options, open the audio mixer using the "M" key and use the multiband compressor "MultiMax" in the "Mastering" effects section. There's also a limiter here, which automatically prevents clipping.
- If you want to combine several audio sources (for instance natural sound, voice-overs and background music), drag the audio files one below the other onto separate tracks. Use the volume faders in the mixer to strike a balance between the volume of audio tracks and set total volume.
- For flexible volume control, activate a volume curve in the context menu of the audio object. Double-click on the curve and curve handles will appear. Use these to adjust the volume the way you want.
- Once everything sounds and looks good, pick "File" > "Export movie" and select an export format in the sub-menu (e.g. MP4). In this way, all the videos you use will be exported together with the master stereo audio track as a video file. You can also transfer the video directly to your smartphone or burn it to disc.
Normalize video audio using Movie Studio Platinum, the video editing software for downright amazing movies:
- Import all common audio and video formats
- Normalize all audio tracks
- Audio mixer for multiple audio tracks
- Mastering FX with multiband compressor for professional volume editing
- Track curves for dynamic volume control
- Helpful program wizards
- File conversion into all essential formats, CD burn function and direct transfer to smartphone
Normalize video audio using software – what you need to know.
Every created a video that's too quiet, but when you increase the volume, it creates an unpleasant crackling noise? This indicates that the audio in your video is "clipping".
If this happens, you shouldn't make the audio track of your video louder – instead, you need to normalize it. When you normalize audio, the tool you use will automatically scan the audio track for the point with the highest volume and then set it to the highest possible level of 0 db. This ensures that clipping won't occur anywhere in the audio track.
To normalize audio is to automatically maximize volume, meaning that the overall volume cannot be set higher without clipping.
However, audio normalization only refers to a single specific point within the audio track. This point is normalized to 0 db. As a result, the volume at other points is often not loud enough. This is often due to a one-off spike in volume that for instance is created when a mike is connected or when the camera is knocked accidentally.
In these cases, it's helpful to cut this kind of outlier and make it into a separate passage. You can then remove it from the normalization altogether and then just normalize the rest of the audio track.
If the audio is still too quiet, it's a good idea to use a compressor in addition. This is an audio effect that automatically sets quieter parts louder. Since loud signal peaks are not modified, there is no danger of clipping.
Compressors also enable you to set a higher average volume, as well as create more transparent sound and better speech intelligibility. For this reason, they're an ideal extension for audio normalization.
Freeware or free apps usually can't cope with these kinds of demanding audio tasks. Video and audio editing software Movie Studio Platinum provides a much better alternative, and it won't break the bank, either. The program offers all the essential features for videos as well as professional audio editing tools – from quick and easy audio normalization to noise removal and audio optimization using various compressors and EQs.
Our step by step guide below shows you how it all works using this video audio editor.
Normalize audio in videos using Movie Studio Platinum video editing software
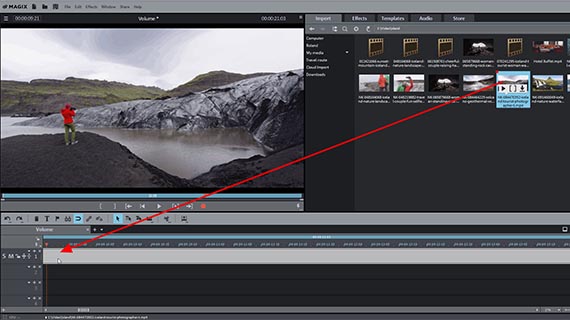
Normalize audio with software: Import video
Start by importing your video into the program. You can do this as follows:
- Open Movie Studio Platinum and create a new project using the Start dialog.
- In the Media Pool in the upper right, locate the folder containing your video file.
- Click the video and, while holding down the mouse button, drag and drop it into the project window.
When you press the spacebar, this will play the project from the start. Press it again to stop playback. The playback marker can be positioned anywhere in the video by simply clicking the mouse button.


Normalizing video audio
- Right-click on the video in the track and select the option and in the context menu that appears, select "Audio functions" > "Normalize (maximum level)".
The video will then automatically be scanned for the point with the highest volume, which will be set to the maximum level of 0 db. Volume levels between this and other sections will not change when this is set.
A single loud section in the audio is all it takes to "push down" the entire signal. You can resolve this issue by cutting the video and normalizing the cut sections separately.
The easiest way to identify louder signal peaks is to make the audio track visible.
- Right-click on the video and under the audio functions option, select "Video/Audio on separate tracks".
- To do this, right-click on the audio object and select the option "Create wave form".
The audio track will now display underneath the image track along with a waveform. The loudest sections are visualized as peaks in the waveform.
- Place the playback marker just before a peak in the waveform and press the T key on your keyboard to split the audio object into two separate objects at this point.
- Place the playback marker after the peak and press the "T" key again. This cuts the audio object again.
- You can now normalize all objects separately.
This will significantly increase overall volume for the audio track.
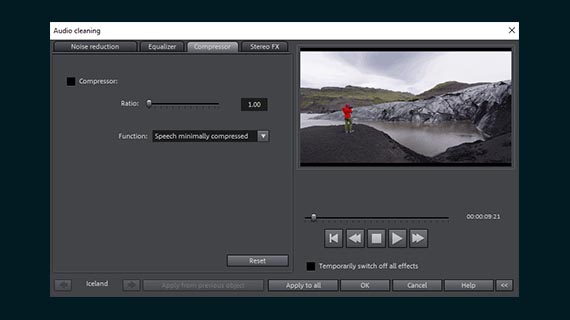
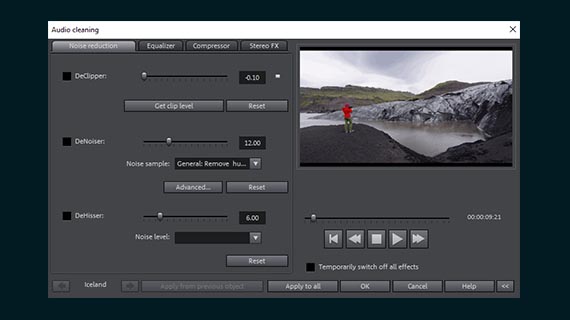
Edit video audio using audio effects
The compressor raises overall volume and enhances speech intelligibility by automatically increasing loudness for quieter sections and balancing out volume levels.
- In the Media Pool, open the Effects tab and click on the "Audio Effects".
- In the dialog box, click on "Audio Cleaning".
- Switch to the compressor dialog and set the effect strength using the slider.
The compressor makes the quiet sounds louder so there's less difference between quiet parts and loud parts, with no risk of additional clipping.
- To accentuate specific frequencies, open the "Equalizer" tab. Here, you can boost high frequencies to enhance audio characteristics that are dull. Alternatively, you can filter out low-frequency rumbling from the signal by moving down the left slider for the bass.
If using the equalizer, clipping can result when loud frequency ranges are made even louder. To avoid this happening, it's better to make the surrounding ranges quieter. In this way you can accentuate the frequencies you want to adjust indirectly.
When quiet parts are made louder, sometimes noise in these parts is made louder too. If this occurs, you can set up a noise removal process via the "Audio Cleaning" dialog.
- The DeClipper mitigates clipping.
- Use the DeHisser to reduce noise on the audio track.
- When applying the DeNoiser first choose a type of noise interference (e.g. "Tape noise removal") or create a noise sample from the audio track. Then set the filtering level and the noise will be filtered out of the audio track.
Tip: If this seems a bit too complicated, you can take advantage of pre-configured effect presets in the "Audio effect presets" in the Media Pool. These can be used to easily modify volume and enhance sounds. You can preview each effect preset first and then simply click it to apply to the audio track.
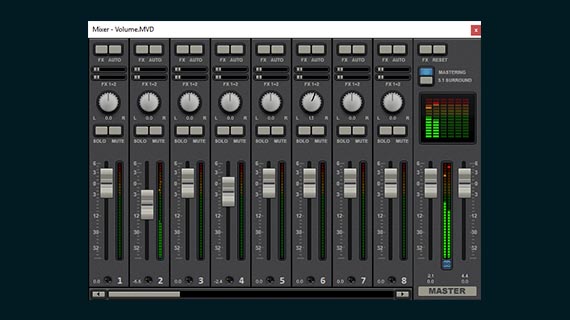
Edit video audio using the audio mixer
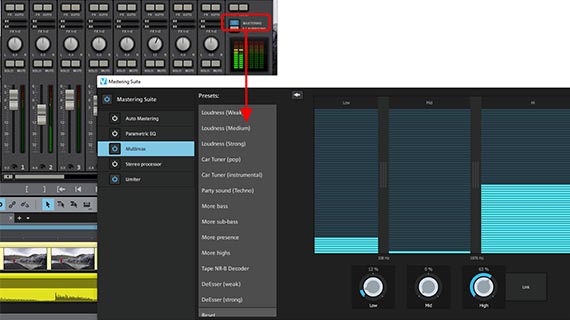
Movie Studio Platinum includes a virtual mixer that offers a wide range of options for professional audio editing. It essentially allows you to mix different audio tracks together and customize their volume and sound. So if you for instance want to combine background music with the sound of the original video recording and add a voice-over, the audio mixer is the right tool for the task. It's great for editing single audio tracks too.
Master volume can be set in the "Master section" in the range on the right. Here you have access to two controllers for both channels of the stereo master.
To combine several audio tracks with one another, first move all audio objects one below the other on a single track. When editing multiple video sources, it's best to move all the included audio tracks to separate tracks. So for instance, move all videos from camera 1 to tracks 1 + 2, all videos from camera 2 to tracks 3 + 4, and so on. By holding down the shift key, you can adjust the video horizontally so that the cuts don't get mixed up.
You should now have all recordings from the same source lying on their own dedicated track in the project.
- During playback, pay attention to the peak meter. This is used to check the volume of each track and identify clipping. In an instance of clipping, lower the volume so that the signal hits a maximum of 0 db at the loudest parts.
- Via the FX button above you can access the track-based editing effects – for instance, a compressor and an equalizer. These effects influence all audio objects on the track.
- Under "Mastering" open the effects for the overall sound. The limiter included here automatically prevents clipping. With the multiband compressor "MultiMax" you can keep all deeper sounds uncompressed and work only on higher frequencies by using precise compression to give them higher volume and more presence.
Edit audio and video – additional software options
Usually, normalizing the audio track is not enough. We've mentioned how compressors and the equalizer can be used above in the article. There are also plenty of other options:
- In the audio mixer, you can position audio recording in stereo panorama. Use the large knob controller above the channel strip to do this.
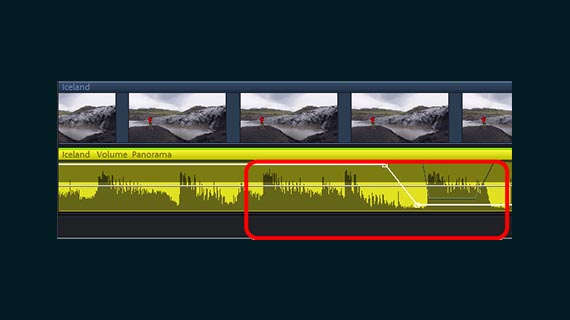
- A panorama curve in the track lets you create stereo effects in the audio track. Activate the panorama curve by right-clicking on the audio object and then selecting the option "Audio effect curves" > "Panorama". Double-click on the track and new curve handles will appear. Use these to drag the curve up (= left in stereo panorama) or down (= right in stereo panorama). In this way, you're moving the sound source via the stereo panorama.
- You can also use this method to define a volume curve for controlling volume. Make the volume curve visible first (in the context menu, go to "Volume curve"). If you raise the curve handles, the volume will increase at this point, and if you lower a handle, the volume will be reduced.
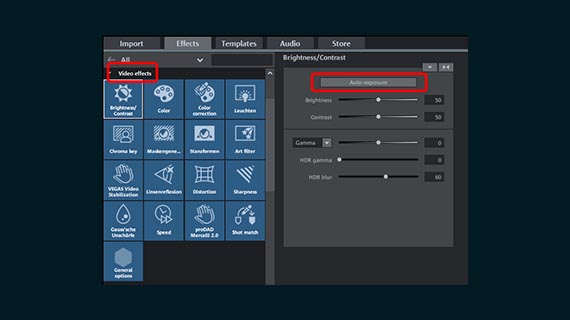
And if the image track needs to be optimized, you can enhance the video image by using the video effects in the Media Pool.
- In the "Brightness/Contrast" dialog, you'll find the instant optimization function "Auto exposure".
- Click on the effects tile "proDAD Mercalli V2" to access a powerful stabilization tool that smoothes out shaky camera movements in your footage. A single click is all it takes to do this task automatically.
- Under "Templates" in the Media Pool you'll see transitions, titles and film looks for giving your recordings a professional cinematic appearance. Simply drag and drop the template onto your video.
That's just three of the easy options offered by the software. Experiment with different effects – if you change your mind about one you've applied, you can undo it with the shortcut Ctrl + Z.
Normalize audio for a video: Export
After normalizing and editing your material, you can export the final video. To do this:
- Create video file: Under File > "Export movie" create a video file in all available export formats for instance as MP4. All audio material on the track together with its effect settings is calculated into this export file.
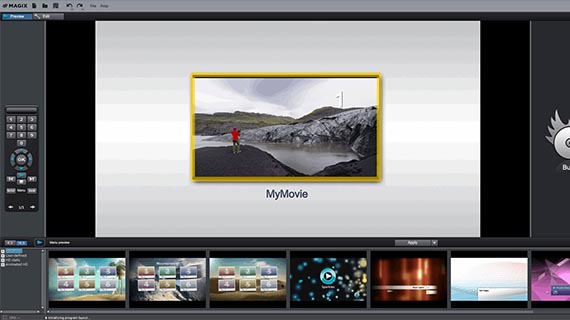
- Burn disc: Or you can also burn your footage to disc – DVD, AVCHD and Blu-ray Disc are all available. To open the "Burn" interface, click to the right on the button with the disc icon. Pick a selection menu layout here and then start the burn process.
- Upload online: Vimeo and YouTube are directly connected to Movie Studio Platinum. Click on the arrow symbol in the top right to open the dialog "Finish movie". Select your profile and then upload the video.
- Transfer to smartphone: In the "Finish movie" dialog you will see the option "Export to mobile device". Here you simply pick a device, Movie Studio Platinum sets the parameters automatically. The video will then be exported and output to your device.


- 1,500 effects, templates & transitions
- Professional video stabilization
- Direct editing + travel routes
- Fast INFUSION Engine
- Multicam and 360° editing


