Reverse video – here's how!
Want to play a video in reverse? Keep reading to learn how!
- Open Movie Studio and import your video.
- Open the Effects tab in the Media Pool and click on the video effect "Speed".
- Click on the "Reversed" button in the effects dialog. If you only want to play a section of the video in reverse, cut it to create a clip. Place the playback marker at the beginning or end of the section and press the "T" key. Now select the cut section and apply the reversed video effect to it.
- Export the entire video or a selected section of the video file in a format such as MP4. You can also transfer it to your smartphone or burn it to DVD.
Reverse video with Movie Studio, the video editing software for downright amazing movies:
- Import all essential video formats
- Play videos backwards with a single click
- Tons of extra effects and professional functions for cutting
- Helpful program wizards
- Conversion to other file formats, burn to DVD, transfer to smartphone
Play a video backwards – what you need to know
Playing video backwards is an entertaining special effect that introduces an interesting and unexpected element to your film. Watch people run backwards or jump on top of a wall without any effort, waterfalls rush back up a cliff, clocks turn back time...
There are lots of ways to put videos in reverse: Video editing program Movie Studio lets you achieve this effect with a single click. You can define sections of your video to play in reverse and have the rest play as normal. Or, combine reverse video with normal, unreversed media such as background music.
Movie Studio offers flexibility for settings when you want to reverse video clips, so you can add a slow-mo or time lapse effects to your backwards video too. So for instance, you can slow down a scene at first, then freeze it completely before reversing the video – all in one natural, seamless movement.
Movie Studio offers a whole range of options for playing a video backwards. Keep reading for a practical step-by-step guide to creating this effect with reverse video maker Movie Studio. You can also learn some top tips for combining reverse video with speed effects.
Reverse video with Movie Studio
Step 1: Import video
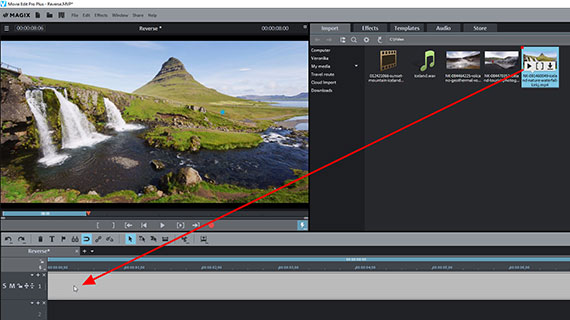
- In the start dialog in Movie Studio, select the option "New project".
- In the Media Pool in the upper right, locate the folder containing your video file.
- Drag and drop the video file into the top track.
- Press the spacebar to play the video from the start normally.
A thin red line will move from left to right above the video track during playback. This is the playback marker, which indicates the part of the video that is currently playing in the preview monitor. You can move it to a different position in the timeline with the mouse. This can be done "live" during playback too.
- Press the spacebar again to stop playback.
This resets the playback marker to the position where playback began.
Step 2: Play video backwards
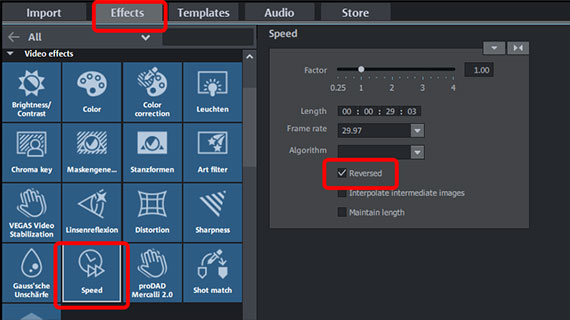
- In the Media Pool, open the "Effects" tab and from the "Video effects" tiles, select the effect "Speed".
- Check the "Reversed" box.
That's it. When you press the spacebar, the video will now play in reverse.
The playback marker will still move now from left to right as it did during the preview. When you play it in reverse, the video in the track is flipped back to front. This might seem unusual at first, but it makes sense. When the backwards video is combined with additional media on other tracks (e.g. background music or voice-over), the backwards video will be the only media that plays in reverse. (We'll explain this a bit more below.)
When you put videos in reverse, there may be dropouts where there's a temporary loss in image. This is a sign that the CPU is overloaded. It won't cause any problems for the end result, since the video file will be exported correctly without any dropouts. That being said, smooth playback is important for detailed control of the editing process.
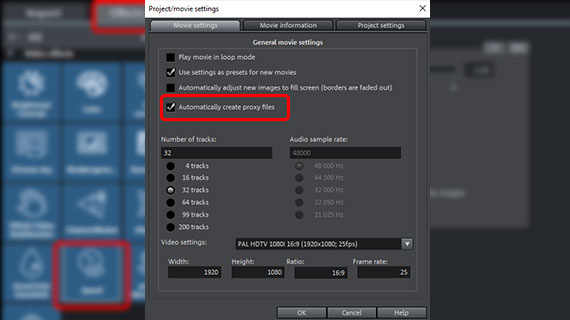
- To improve playback performance, go to "File" > "Settings" >Movie", and in the settings dialog, activate the "Automatically create proxy files".
This process creates low resolution proxy files that are used for playback instead of the larger original files. When you export the file or burn it to disc afterwards, the original files will be used so that there's no loss in quality.
The video should now play smoothly backwards.
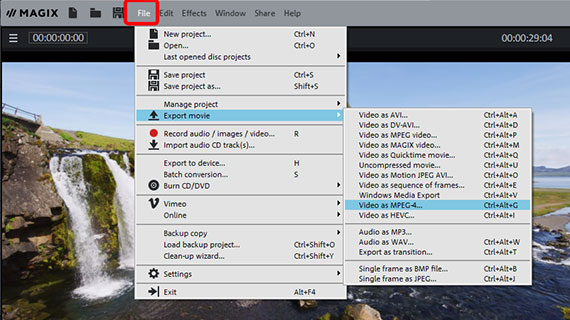

Step 3: Exporting a reverse video
To export your backwards video as a file, follow these steps:
- Select "File" > "Export movie".
- Select a file format. e.g. QuickTime Movie, MPEG-2 or MP4, and start the export.
If you just want to export a specific section of the video, you first need to set a playback range in the range bar above the first track. A left click sets the start of the range, a right click sets the end. The range will appear as a blue bar and you can drag & drop to adjust its size. In the export dialog, activate the option "Only export selected range".
Alternatively, you can burn the video to disc (DVD, Blu-ray or AVCHD) or transfer to smartphone. The options for this can be opened by clicking the buttons in the upper right-hand corner of the program.
But Movie Studio enables you to do much more than just reverse a video clip. Keep reading to learn some special tricks that could be of interest if you want to make a reverse video.
More creative options for making a reverse video clip
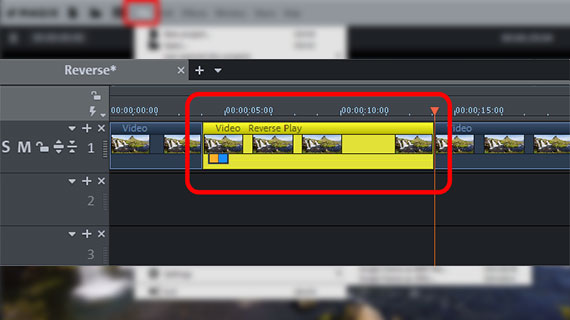
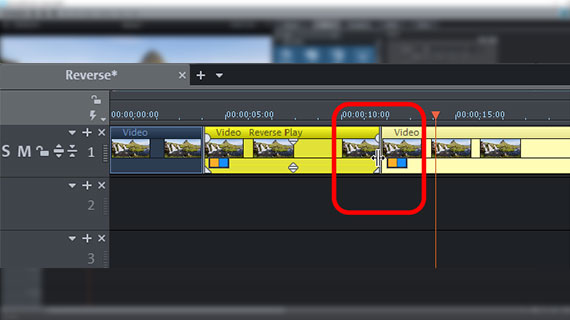
Reverse section of video
Usually people just want to reverse a video clip, not the entire video. To do this, you'll need to cut the video beforehand.
- Play your video as normal and find a scene to use for a reverse video clip.
- Place the playback marker at the beginning of the sequence and press the "T" key to cut. The video will then be cut at this position.
- Place the playback marker at the end of the sequence and press the "T" key again.
You have now cut the sequence into a separate video object. This object can now be edited independently of the ranges before and after it, and you can also apply effects to it.
- Click on the cut sequence so that you're only selecting the middle video object – it will appear light yellow.
- In the effect dialog, select "Reversed".
- Place the playback marker to the left and outside of the sequence and press the spacebar.
You will see the video start playing forwards as normal. Once the sequence is reached, playback direction switches and the video maker plays the video in reverse. i.e. from the end of the sequence back to its beginning. The video image will then jump to the position where reverse playback started and the video will start playing forward from here as normal.
You can easily adjust the borders of the reverse video clip after the fact:
- To do this, move the mouse to an object border until the mouse pointer turns into a double arrow.
- Click and drag the borders of the reverse video section to the location where you want the reverse effect to start and finish. For more precise adjustments, zoom in on the display by holding down Ctrl and scrolling with the mouse wheel.
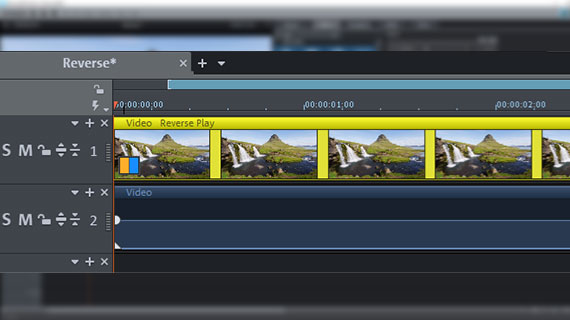
Play video image backwards and keep original sound
Before, the audio track was played backwards along with the video track. When the images simply play in a reverse sequence, this creates a "rewind effect" on the audio track that sounds like a tape being wound backwards. The audio sounds completely distorted and is often unrecognizable.
For this reason, image and sound should be separated when played in reverse, to ensure that the audio – for instance original vocal commentary – sounds normal as the video images plays backwards.
To do this, follow these steps:
- Right-click on the video in the track and select "Audio functions" > "Video/Audio on separate tracks" in the context menu.
The audio track will be extracted from the video and loaded to track 2. The video track remains on track 1.
Both objects are still grouped at this point. To play only the video track in reverse, you need to ungroup the objects first.
- Click the "Ungroup" button in the toolbar.
- Click first on an open area in the program window to clear the current selection.
- Then click on the video track to select it without the audio track.
Now only the video track displays in a brighter shade, while the audio track below stays dark – this way you know you've selected the video track.
- Check the "Reversed" box in the effect dialog "Speed".
When you play the video, you will now see the video track play backwards. The audio stays the same.
Combine reverse video with original, unreversed media
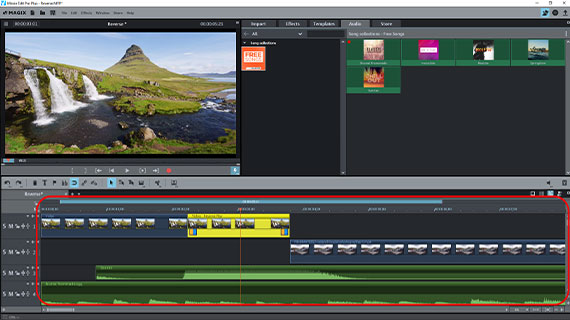
We've just showed you how you can keep the original sound in a video and reverse the video track only. But you might want to know: how do you play a video in reverse and combine it with other media that plays normally? You can do this in the following way:
- Start by loading all media that you want to include in your video to separate tracks and arrange them in the sequence you want.
Once your first video is loaded to tracks 1 and 2, you could drag a music file to track 3 and additional sound effect files to track 4, for instance.
Make sure to arrange the videos correctly in sequence, one after another. Videos should only be arranged beneath each other if you're using a mix of image effects or picture-in-picture effects – in these cases the video images are combined with each other. When videos are arranged below each other, only the bottom image is displayed.
When audio tracks are placed on top of each other in the timeline, they can be heard simultaneously. The volumes for each track are merged too, so you'll need to balance volume to ensure no clipping occurs. To balance the volume, press the "M" key to open the audio mixer and use the effects you find there.
- In the second step, select the video objects that you want to play backwards and apply the reverse video effect.
Cut in the way described above to play certain sections of the video backwards. All other media in the project remains unchanged and is played back as normal.
Pro tip: Slow down video and play in reverse
As promised, we're rounding off this guide with some top tips for making the most of the intuitive workflow and tools offered by Movie Studio. We'd like to show you how to use a dynamic slow motion effect to slow down your video gradually until it stops. After a pause the video is then "wound back", i.e. it is played in reverse until it comes right back to the image at the start of playback. The result is a reverse video clip that plays in a loop.
This "JoJo" special effect works best in a video where the image movement is restricted to a small section – for example a recording of a waterfall made using a tripod.
Here's how you do it:
- Cut your video into a short clip of about 5 seconds' length.
- This effect configuration can't be applied to the sound, as the audio cannot come to a standstill – it will just switch off. So you need to delete the audio track from the video (right-click the video in the project window and select > "Audio functions" > Remove audio object") or separate sound and image from each other as described above. If you don't do this now, the program will ask you later anyway if you want to remove the audio track.
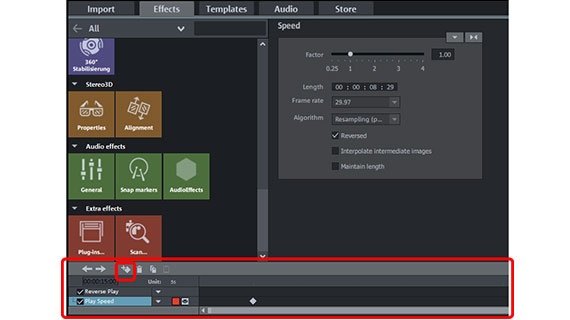
- Position the playback marker just after the start, then open the Speed effect dialog and and add a keyframe from the Media Pool below. This means that the video will play at normal speed at this keyframe.
- Set the playback marker just before the end of the clip. Then, in the Speed effect dialog under "Factor", enter the value 0.01 and press enter. This stretches the video object in the track, since the playback speed is slowed down significantly and it takes longer for the video to play from start to end. A keyframe with the new 0.01 value will be set automatically. Within the range between the two keyframes, the video is now decelerated gradually from 1 to 0.01 until it comes to a halt at the second keyframe.
- Play the video and find the point where you want the playback direction to be reversed. Cut the video at this point (e.g. after 7 seconds). Delete the part after it from the track.
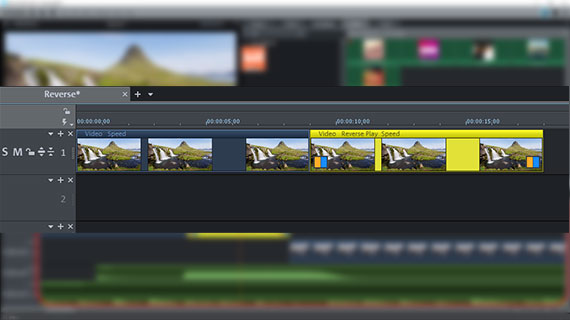
- Click on the section to the left while holding down the Ctrl key and drag out a copy of the section on the left. Arrange these objects directly after each other so that the object borders snap together.
- Click on the copy and activate the option "Reversed".
As a result of this configuration, the first section of the video will play at a slowed-down rate until the second keyframe is reached. Playback will then continue with the second video object, which plays in reverse beginning with the final frame (which is also the final frame of the first object). This allows for a seamless transition between the video sequences. When you start playing the reverse video clip, it starts off slow and then speeds back up to normal playback speed.
Reverse video with Movie Studio, the video editing software for downright amazing movies:
- Import & export for all relevant formats
- Quick cut & detail cut
- Automatic wizards
- Up to 900 effects & music
- Intuitive templates for intros, outros, captions and subtitles, transitions, opening credits and much more
- Burn videos to DVD & Blu-ray (and design your own menus)


