Mix audio from different sources
– here's how it's done.
Want to create a playlist mix – or mix music you've created yourself? Keep reading to find out.
- Download Music Maker Free, install the free program and start a new project.
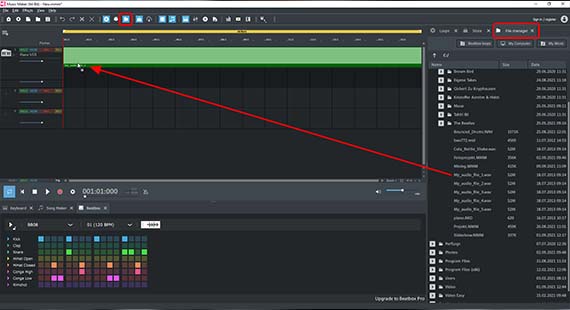
- To use your own MP3 songs or audio CD tracks for mixing and mastering, go to the File manager view above in the toolbar. Browse for song files and drag & drop them into the track window. Audio CD tracks must first be converted before they can be used by the file system. To do this, select the function "File" > "Import" > "Import audio CD track(s)" from the menu.
- Use the spacebar to start and stop playback. Sort the songs one by one and use different tracks to crossfade between songs. Adjust the fades using the fade handles at the upper object edges. If you want to skip an intro, drag the left object edge at the beginning of the song to the right until the beat starts.
- For mixing the music samples included in the program, on the right, switch to the "Loops" view. Start by selecting a drum loop and then combine the drums with bass and additional samples from different instrument categories (e.g. piano).
- Mix all audio sources with the mixer (button "M"). Adjust the volume levels of the tracks and apply DJ effects like a compressor or EQ to blend the sounds together if you want.
- Once you're finished, you export your mix as a WAV or OGG file in the "File" menu.
Audio mixing
Whether you're a beginner or an advanced user, audio mixing results in an audio file with your favorite songs that's perfectly mixed with even transitions in song tempo and seamless fades. Alternatively, you can mix music yourself using samples or your own recordings. Whatever your idea of audio mixing is, with Music Maker you can put it into practice for free and without any previous experience. For audio mixing for beginners, there's no better program.
Music Maker enables beginners who want to learn professional mixing and mastering overcome all technical and musical hurdles. Just trust your instincts and make great music. Drag the songs you want to mix from the file manager onto the tracks and blend them into a homogeneous remix. Synchronize their playback speed by time stretching and add crossfades between songs. Break up songs into samples and mix them with the loops provided. You can then add the final touches to the whole thing with mastering effects such as equalizer or compressor, and mix it all with the built-in mixer to produce the perfect DJ tracklist.
There's no limit to the creative possibilities for music. With Music Maker Free, you can learn to make beats and everything else you need to know step by step. In this guide, learn everything you need to know about mixing music on your PC.
Here are the basic steps:
- Download Music Maker Free and double-click the installation file you downloaded to install the software.
- Start Music Maker and create a new project using the start dialog.
Then, you can start to make a DJ remix.
Create playlist
Generally, a DJ performs by mixing music live during a party using two turntables or CD players. It's also possible to prepare this list in advance and then have it play automatically at a party. To do this, first load all the songs you want use to make a party mix into a project in Music Maker.
On the right-hand side you'll find the Media Pool. When you first start the program, it is in the "Loops" setting.
- Click on the "File manager" button in the upper toolbar.
- Go to a folder containing the songs that you would like to use.
- If you want to import songs from an audio CD, use the "Import" > "Import audio CD track(s)" option in the "File" menu. Audio CD tracks cannot be processed directly with the file manager like MP3 tracks, because they have to be "ripped" first.
- Drag & drop all song on the left onto the tracks.
You can move any song around freely. It is best to start by arranging the songs in one shared track one after the other.
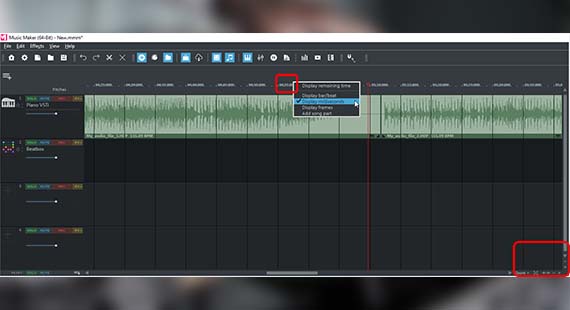
For a long project with lots of songs, using the zoom function is important – this can be used to change the display as needed.
- Click the zoom buttons in the lower right of the track window to enlarge or reduce the visible area in your project.
You can zoom horizontally and vertically. When zooming vertically, the waveform display becomes wider.
- To play or pause the project, press the spacebar.
During the playback, the playback marker moves across the track range from left to right and shows the position that is being played back. You can move the playback marker in the bar ruler above the first track at any time by clicking.
By default, the units of measurement in the timeline are bars. This setting is ideal for music production, however units of time are more useful for playlists.
- Right-click above on the bar ruler and change the units to milliseconds.
Now, you can tell how long your audio files are in the bar ruler and at which exact time the playback marker is positioned.
Song mixing
Once the songs are arranged in the order you want in the playlist, you can start working on the transitions. Ordinarily, all the songs should blend into each other smoothly.
- To blend two songs into each other, drag the song on the right onto the track below the other song.
- Move the song on the right a little to the left on the lower track so that its beginning begins to overlap a little (for about 5 seconds) with the end of the song before.
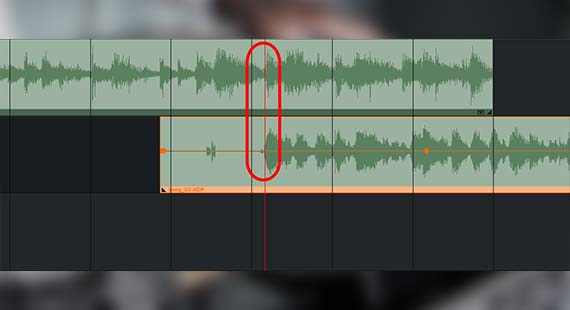
Then, try to synchronize the rhythms of the two songs as best you can. Use the waveform display to do this.
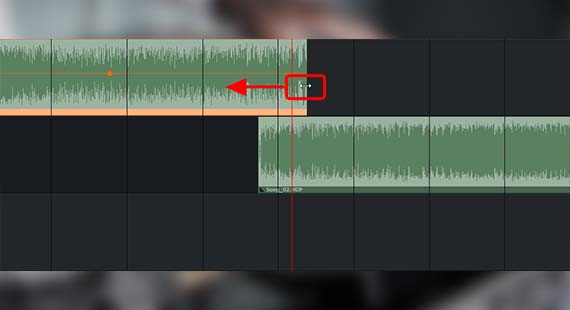
- If the first song ends with an outro that you don't want to use, shorten the end by moving the right object edge inward.
- If the second song has an intro that you want to cut, move the front object edge to the right until the beat kicks in.
- Move the beats of the songs so that the end of the first song and the beginning of the second song are slightly overlapping each other. Pay attention to the peaks of the beats in the waveforms when doing this.
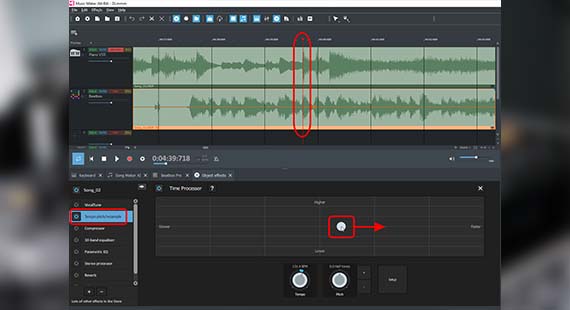
Mixing audio tracks together works best if the songs have the same tempo – but usually, they don't. In this case, you can modify the song tempo with a timestretching effect. For this you need the add-on module "PLUS FX", which you can purchase in the Store.
- Select a song whose tempo you want to change, open the object effects by clicking the FX symbol in the toolbar and then select "timestretching".
- Play the song back and use the dots in the interactive visual to change the playback speed without changing the pitch.
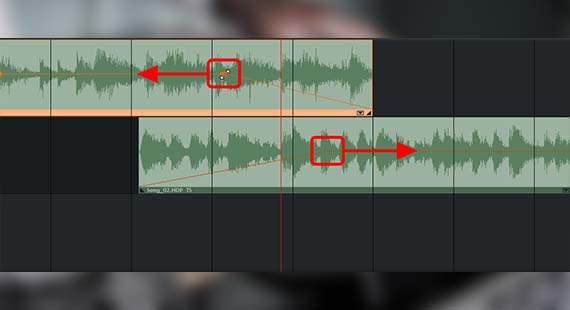
At the end of the first song, add a fade to create a smooth transition.
- Make a fade-out at the upper back edge of the leading song by dragging the object handle inward to the left.
- Create a fade-in at the upper front edge of the following song by dragging the object handle inward to the right.
Now, both songs should blend into each other smoothly during playback without any interruption in the music.
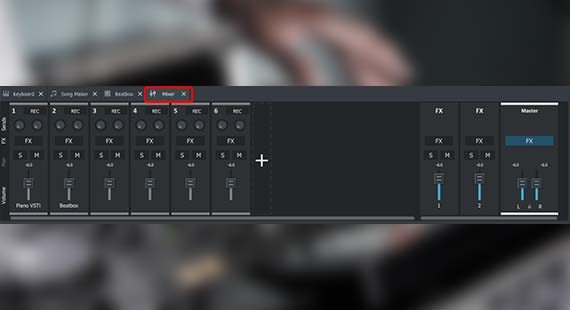
If you want, you can also edit and master the sound of each song using DJ effects:
- Use object effects – the equalizer or a compressor are especially useful here – to modify the sound of a song.
- You can apply a uniform sound to an entire track using the mixer. Open the mixer by pressing the "M" key and click on the corresponding "FX" button above the channel strips. On the right in the mastering section, you'll find additional effects for controlling the overall sound.
Export your music mix
Once you've finished mixing and mastering your song compilation, you can export it directly as a WAV file or in the compressed format OGG.
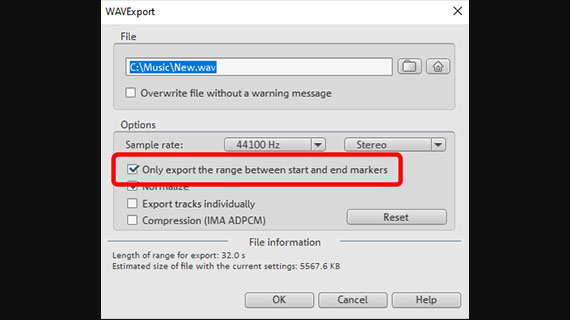
- Choose "File" > "Export" and the format you want.
- To export only the current playback range, select the "Only export the area between the start and end markers" option in the export dialog.
During export, all tracks in the arranger are mixed down together with all effects and mixer settings into one "proper" audio file. The final result will sound exactly the same as when played back in Music Maker.

Mix music yourself
Instead of mixing music by other artists, you can get even more creative and learn professional mixing and mastering so you can mix your own music. You can combine samples offered by the program to build new song structures and then add your own vocals or recordings made with software instruments included in Music Maker, for example.
Soundpool loops
- All the Soundpool loops available can be found on the right. The free Soundpool "Feel good" is installed with Music Maker Free. Additional Soundpools from virtually any genre you can think of can be installed using the program's in-app Store.
- On the right, select the category of instruments in the Soundpool. For "Feel good", the instruments are "bass", "brass", "drums", "FX" etc.
- Select individual samples from any category in the list below.
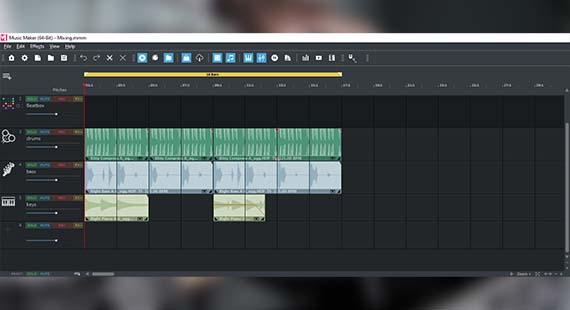
It works like a musical puzzle: You load various samples and then combine them with others to create your own music.
- If you move the mouse to the back edge of an object in the arranger, the mouse pointer will turn into a double arrow. You can now click and hold the double arrow to drag out the section. It will then continue to play as a "loop".
- Above track 1, you can see the playback range. This range will be played back as a loop. You can now use the mouse to shorten or lengthen the playback range to the length you want.
- The tempo can be set in the transport control. The default is 120 BPM. If you slow the tempo down to 90 BPM, the samples will take on a whole new, more relaxed character.
Tip: If you only want to create a background arrangement for your recordings, don't use too many different instruments, as this can make your sound become too crowded. In most cases, drums, bass and a couple of piano or keyboard samples will be enough.
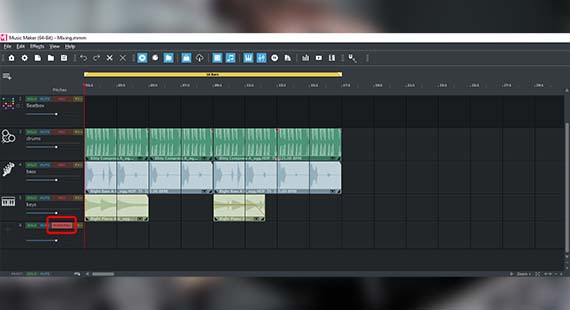
Vocal or instrumental recordings
To record your own music with vocals and/or a "real" instrument, follow these steps:
- Connect a microphone to the microphone input of your computer. You can also use the built-in microphone on your computer. However, this will not provide particularly high-quality recordings.
- Switch an empty track to the mode for microphone recording. Click on the red recording button on the left side of the interface in the track header until "AUDIO REC" appears.
- To use an existing arrangement as accompaniment, you should use headphones so that the other tracks are not picked up by the microphone.
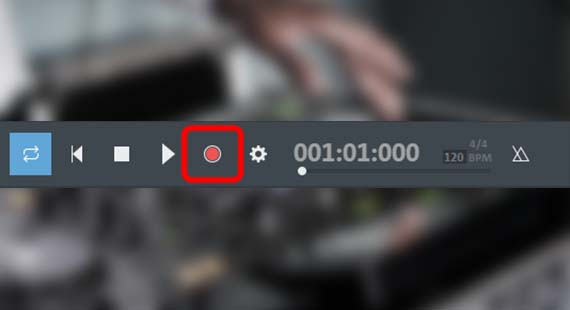
- Start the audio recording by clicking on the red record button in the transport control.
Now, the recording will start and you can begin your performance. During the recording, an audio block will be created that will become increasingly longer as the recording continues.
- When you're finished, click on the stop button.
Software instruments
To finish the track, you also have the option of using the included software instruments. All software instruments are played like any keyboard instrument using the computer keyboard or with a MIDI keyboard. Alternatively, you can use the MIDI Editor to program melodies note by note. To open the MIDI editor, double-click on a MIDI object. This is particularly useful for drum beats, where every beat should sit in a specific place.
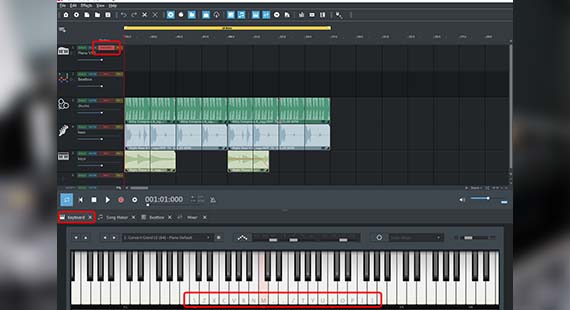
- Click once on the keyboard at the bottom of the monitor to activate it.
Letters and symbols will now appear on some of the keys. These keys indicate the notes on the computer keyboard that you use to create the corresponding sounds. To create harmonies like in a chord, press several keys simultaneously. You can play the normal C major scale using the top row of your computer's keyboard (starting on the left with the letter "Q" and ending on the right with the "[" symbol).
Through trial and error as well as a little practice, you'll learn to play instruments dynamically and accurately on the computer keyboard. Alternatively, you can use a MIDI recording keyboard, as mentioned above.
To record your playing, you need an "armed" MIDI track, on which you wish to record. Track 1 is set up for a piano recording by default.
- Click on the red recording button on the left side of the interface in the track header of track 1 until "MIDI REC" appears.
- Click on the red "Record" button in the transport control.
Now, a MIDI recording will start.
This recording process works the same way as recording audio, as described above.
Mixing all music tracks together
Finally, when you have compiled and recorded Soundpool samples, your own vocals and software instruments, you can open the mixing console (M key) for mixing and mastering all tracks.
Add-ons for the program
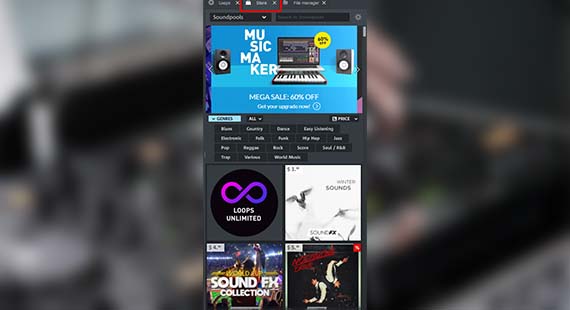
You've now learned about the most important functions for mixing and mastering audio of any kind. But there's much more to discover in Music Maker. The basic version, Music Maker Free, can be expanded with additional content from the Store, which can be accessed from directly within the program.
As well as further Soundpools and software instruments, you'll also find a number of different professional effects and additional program functions that you can purchase and immediately start using in Music Maker. This will help you to develop your music skills over time.
- Click on the "Store" tab in the Media Pool.
- Sort the items using the drop-down menu.
- Browse through the products offered. Click on an item for more information.
- Click on "Purchase" and follow the instructions provided.
Tip: Sort the products by price to display the free offers at the very top. All you have to do is register as a MAGIX customer to get free products.


- Only now for free in this offer:
- iZotope Ozone 11 Elements (€ 55 value)
- Native Instruments Hybrid Keys (€ 49 value)


