Removing audio from video – here's how!
Follow these steps to separate the audio from your video:
- Open Movie Studio Platinum and drag & drop your video from the Media Pool to import it.
- To remove the audio track from the video, right-click the video in the project window and select "Audio functions" > "Remove audio object" in the context menu. To separate the audio from the video, select instead "Audio functions" > "Video/Audio on separate tracks". This will separate the audio from the video, allowing you to cut or edit it on its own.
- To add an additional audio track, drag the audio file you want to use from the Media Pool onto a separate track in the project window. To adjust the volume levels of the audio tracks, use the audio mixer ("M" key).
- Lastly, export your video by going to "File" > "Export movie". Select a suitable export format (e.g. MP4). You can also burn your movie direct to disc or transfer it to your smartphone. The options for this can be opened by clicking the buttons in the upper right-hand corner of the program.
Removing sound from video with Movie Studio, the video editing software for downright amazing movies:
- Import all common video formats
- Remove, delete and separate audio from video, as well as change and combine audio
- Multi-track audio mixer
- Extensive cutting and editing features for picture and sound
- Professional sound mastering, complete with multiband compressor and limiter
- Tons of helpful program wizards and easy-to-use tools
- File conversion into all essential formats, CD burn function and direct transfer to smartphone
Removing audio from video – here's what you need to know
Video files normally contain one picture track and one sound track. Oftentimes, the sound track is full of useless background noise, or the sound quality is too poor to be used. In cases like these, the audio needs to be separated from the video and either removed or replaced by a sound track with better audio quality. The original audio track is extracted from the video file and separated from it.
In other cases, the audio track is extracted and then edited separately to remove background sounds, improve the clarity of speech, or to remove noise or rumbling. Oftentimes, you'll want to add extra audio tracks with background music or sounds to supplement the video's original audio track.
To do this, you need a powerful video editing program capable of not only cutting videos, but also of providing all of the audio features needed to extract and remove audio from video and to replace or combine the original video sound with other audio tracks.
We recommend using Movie Studio Platinum. This powerful video editing software provides not only video editing and image optimization tools, but also professional audio features for separating, removing and editing audio and adding recorded vocals, background music and other sounds.
The article below explains step-by-step how to remove and edit audio in a wide variety of ways using Movie Studio Platinum.
Separating and removing audio from video
with Movie Studio Platinum
Removing audio from video: Import video
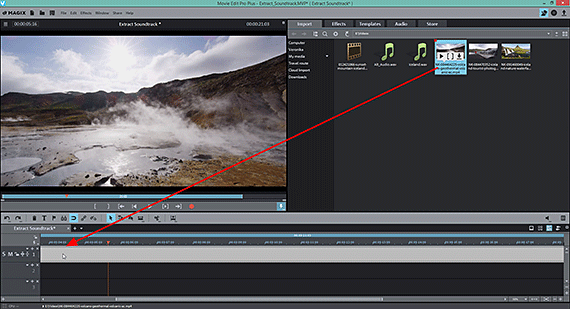
First, import your video into Movie Studio Platinum.
- Open Movie Studio Platinum and create a new project.
- In the Media Pool in the upper right, locate the folder containing your video file.
- Drag & drop the video file onto the project window. To combine several videos, place them one-by-one on the top track.
- To play the project, press the space bar. You should now see the video picture playing smoothly in the preview monitor, and you should also hear the audio.
Tip: If video playback is choppy, your system is overloaded. In this case, it's a good idea to use proxy files. To do this, go to "File" > "Settings" > "Movie" and enable the option "Create proxy files automatically". Now, instead of using the original high-resolution video files for editing, the software will use smaller placeholder videos which can be edited and played much more easily. When you export the project or burn it to disc at the end of editing, the original high-resolution files are used instead of the proxies.
Removing audio from video:
Delete the audio track from the video
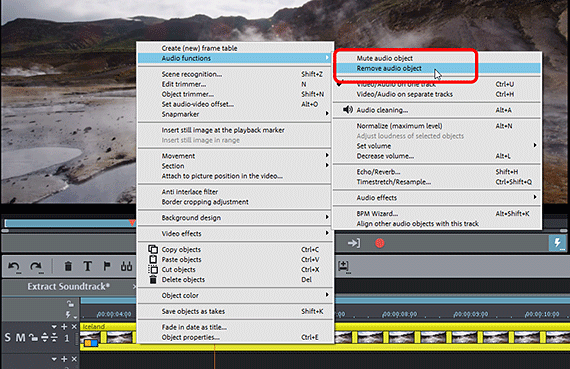
- To remove the audio track from the video, right-click the video in the project window and select "Audio functions" > "Remove audio object".
This method is useful if the audio track is completely useless (e.g. full of noise).
In all other cases, we recommend muting the audio track instead. When you do this, the audio track is not deleted. Instead, it is retained in case you need to use it later (e.g. for dubbing or other audio recordings).
- To mute the audio track, right-click the video in the track and select "Audio functions" > "Mute audio object".
Now, when you play the video, you won't hear the sound even though the audio track is still there. You can unmute the audio track at any time to hear it.

Removing audio from video:
Separate the audio track from the video
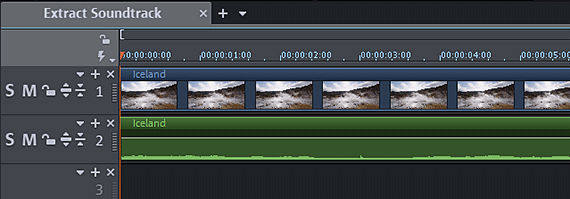
The video in the top track contains both the picture and the sound track. You can't see the sound track, but you can hear it when you play the video.
To see and edit the sound track separately, follow these steps:
- Right-click on the video and select "Audio functions" > "Video/Audio on separate tracks" in the context menu.
The video will now be split into two objects: a picture object without sound on Track 1, and an audio object without picture on Track 2.
Track 1 is the video track, and Track 2 is for the video sound.
To gain a better understanding of what is happening acoustically on the audio track, you can also turn on the waveform display for the sound:
- To do this, right-click on the audio object in Track 2 and select the option "Create wave form".
A waveform will appear. The waveform isn't strictly necessary for editing the audio track, but it's recommended since it provides you with a clear overview of your audio material and allows for easier editing.
The video object on Track 1 and the audio object on Track 2 are grouped together. This means that they can only be selected, cut and moved together. This is to prevent the picture and the sound from accidentally getting detached from one another and mixed up with other material.
However, it's also possible to ungroup them. To do this, click the "Ungroup" button in the toolbar. The complementary "Group" button can be used to combine ungrouped objects into a group again.
To edit the video sound independently of the video (e.g. to remove a specific noise from the sound without having to cut the picture as well), follow these steps:
- First, cut the picture and the sound together. To do this, place the playback marker where you want to cut, and then press the "T" key.
- Hold down the Alt key and drag the cut border below on the audio track to the left. This will trim only the audio object.
- Release the Alt key. The picture and sound are once again grouped.

Removing the video sound and combining it
with other audio tracks
Oftentimes, you'll want to replace the original sound track with other audio material once you've removed it. To do this, follow these steps:
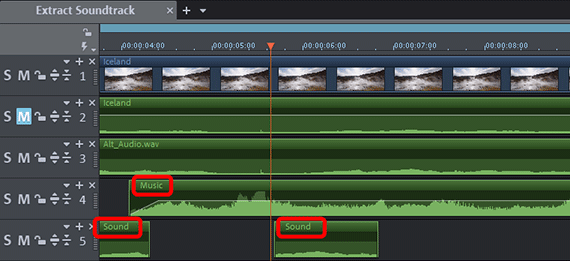
- Load the alternative sound track into Track 3.
- Enable the waveform display (see above). If you need to, zoom in on the display by holding down Ctrl and scrolling with the mouse wheel.
- Use the waveform display to synchronize the two audio tracks. In other words: Move the audio object on Track 3 so that the wave peaks and valleys line up with those of the original sound on Track 2 and so the two waveforms match.
- Then, mute the original sound. To do this, click the M button in the track header to the left on Track 2 ("M" = mute).
The original sound track has now been replaced by the alternative audio.
To add additional audio material to your video, follow these steps:
- Drag a file containing background music onto an empty track (e.g. Track 4).
- Drag a file containing noises or sound effects onto yet another empty track (e.g. Track 5) and arrange the two tracks so that they fit the video track.
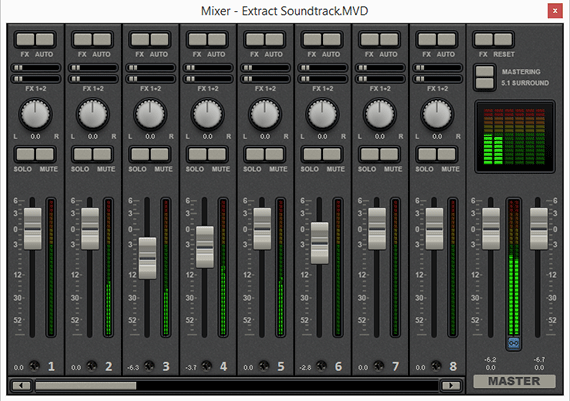
When you play the video, the combined audio tracks will be mixed together, and their volumes will be summed. This can easily lead to clipping. It's a good idea to check and adjust the volume level of multiple audio tracks.
To do this, press the "M" key to open the audio mixer.
- Here, each audio track has its own volume slider.
- The "FX" button and "Master" button to the right open the effects for the individual tracks and for the overall sound. To edit the volume, we recommend using the compressor, which leaves loud parts untouched while raising the volume of quiet parts. This also improves the clarity of spoken parts.
- The peak meter is useful for finding instances of clipping. If an audio track is clipping, its respective volume slider should be turned down until all peak meters are kept below 0.
Tip: Volume curves (right-click the audio object and select "Volume curve") can be used to lower and raise the volume at specific locations.
Removing sound from video – export
Lastly, after the volume of all audio tracks has been adjusted appropriately and the image quality is acceptable, you can export your video in a variety of formats. All of the audio tracks in the project will be combined into a single stereo recording and added to the video file.
- Create video file: Go to "File" > "Export movie" to create a new video file, e.g. in MP4 or MOV format. There are a range of codec settings and presets available in the Export dialog.
- Burn to disc: To open the "Burn" interface, click on the button with the disc icon in the upper right corner of the program. Select a disc type (DVD, AVCHD or Blu-ray Disc), then start the burn process.
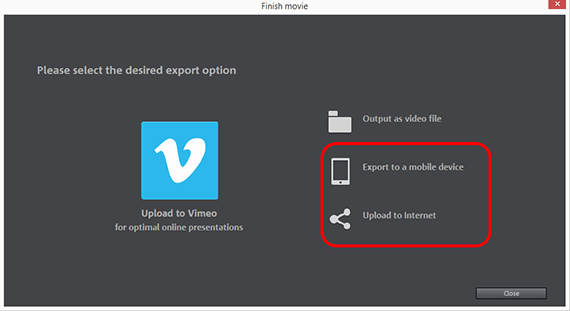
- Upload to the Internet: Vimeo and YouTube are directly connected to the program. Click on the arrow symbol in the top right to open the dialog "Finish movie" and upload the video to your profile.
- Transfer to smartphone: In the "Finish movie" dialog you will see the option "Export to mobile device". Select a device, and Movie Studio Platinum will handle the rest. The video will be exported and transferred to your device together with all of the audio tracks.


Removing sound with Movie Studio, the video editing software for downright amazing movies:
- Import & export for all relevant formats
- Quick cut & detail cut
- Automatic wizards
- Up to 900 effects & music
- Intuitive templates for intros, outros, subtitles, transitions, opening credits and much more
- Burn videos to DVD & Blu-ray (and design your own menus)

