Converting files
– Here's how!
Do you want to learn how to convert audio files? Keep reading to find out how.
- Download Music Maker Free, install the program and create a new, empty project.
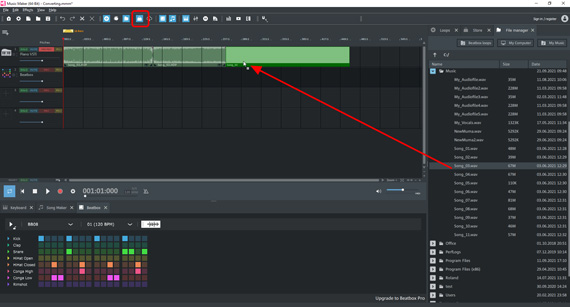
- Click the File manager icon in the upper toolbar. The File manager will open in the right area of the program interface.
- Navigate to the folder containing your audio files and drag and drop the audio files you want to convert onto any track in the arranger.
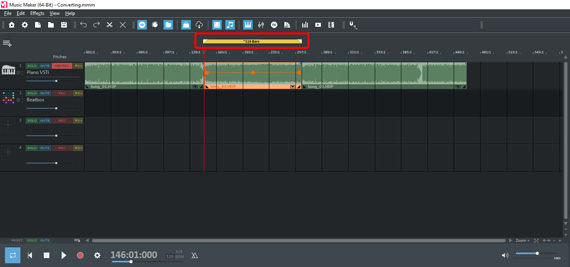
- Decide whether you want to convert the entire project or only a specific range. In order to export only a certain part, place the playback marker above the first track over the part. Drag the bar to the desired end position. In the bottom right, you can zoom out to see the entire project.
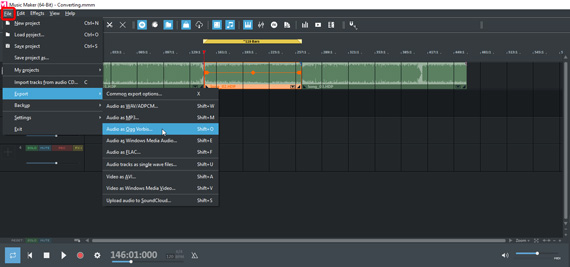
- To convert, select "Export" from the Export menu and then choose one of the formats available: MP3, Ogg Vorbis (*.OGG), Windows Media Audio (*.WMA) or FLAC. For MP3 and FLAC export, you need to purchase a fee-based add-on. The formats OGG and WMA are available free of charge.
- In the export dialog, choose a a target directory and a file name for the converted file to be saved. If you want to export the material within the playback range only, activate the "Only export the area between the start and end markers" option. Click "OK" to begin the export. Afterward, you will find the converted file saved in the specified folder.
Convert audio files
Every once in a while a music player malfunctions and certain audio files won't play. If that's the case, you might have to convert songs into another format. Or perhaps you need to fit as much music as possible on a CD or other data storage medium. Then, you'll need to convert the original audio files, e.g. from an audio CD, into a more space-efficient compression format such as MP3 or OGG.
There are a number of software tools that can be used to convert audio CD tracks, wave files as well as other audio formats. However, most of these tools are limited to this one task. They allow you to convert your files, but nothing else. Perhaps your compilation of songs could also use some enhancement to the audio? Or maybe the volume levels need adjustment? Or maybe you want to edit one song together to fade into a second song?
Rather than using simple, limited freeware tools, we recommend that you use an audio editing program like Music Maker that can reliably perform all tasks related to audio editing, in addition to converting audio files. Music Maker is easy-to-use, broadens your creativity, a pleasure to use and the basic version is also free. It lets you convert audio CD tracks and other audio files to all standard formats as well as make your own recordings.
In fact, Music Maker is a complete, virtual recording studio for audio and music production. You can easily use the included Soundpool loops to create your own music via drag and drop to produce a background track for slideshows or videos, for example. Alternatively, you can play the integrated VST instruments using your computer keyboard or with MIDI keyboard and make your own music. You can then add the final touches to your recordings with effects such as equalizer or compressor, and then mix down your tracks to produce the perfect work of creativity.
Or you could simply convert your audio files. Find out how to do just that in this article.Here are the basic steps:
- Download the free version of Music Maker.
- Double-click the installation file you downloaded to install the software.
- Start Music Maker and create a new project using the start dialog.
An empty project window will open and you can begin.
Converting audio files with Music Maker
Importing audio files
To begin, you need to import one or more audio files that you would like toconvert. You can convert each file individually or combine multiple recordingsinto one file.
- Click the File manager icon in the upper toolbar. This will open the File manager in the right side of the program.
- In the File manager, go to a folder with the audio files.
- Drag & drop the files you want to compress into the tracks on the left.
If you want to compress several files, no matter whether each one separatelyor several together into one file, then drag the audio files one after theother into the tracks. You can move them wherever you want: One after the otheronto the same track, or one below the other on different tracks.
If the display is too small, use the zoom function in the lower right of thetrack window.
Make sure that the individual audio files do not overlap, but are positionedone after the other. This is, unless you want to mix the audio recordingstogether. We cover that below.
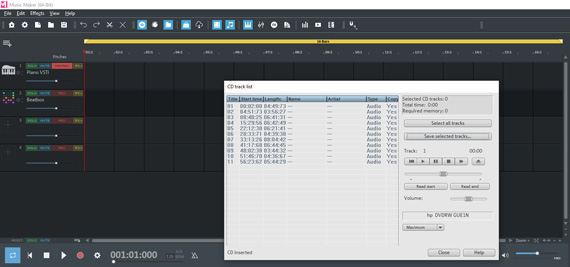
Unlike other audio files, you can't access audio CD tracks in the File manager. Although they are in a digital format, they must be "grabbed" or "ripped" in a certain way so that the computer's file system can access them. Music Maker offers a special function in the "File" menu that enables you to do this.
- Insert the audio CD into the drive and select "Import" > "Audio CD track(s)" from the "File" menu. A dialog with the tracklist will appear.
- Click "Select all tracks" or hold down the Ctrl key to click the CD tracks you want to import.
- Click on "Save selected tracks".
Afterward, the CD tracks will be converted to WAV files and inserted into the Music Maker project. Now, you can begin converting them into other formats.
Specifying the playback range
When combining several files, it's advisable to play the song transitions to check that everything sounds as intended.
- Press the spacebar to play the project (and again to stop it).
- Click to move the playback marker in the timeline above the first track at the desired position.
Playback always occurs within the yellow-highlighted range above the top track. This area is additionally important for specifying which part of the project will be compressed. You can choose to convert the entire project from beginning to end, or just the current playback rane.
If you only want to convert a specific area within a project, make sure that the playback range is exactly over the desired portion.
- To change the range, you can drag the ends of the yellow playback range to the left or right with the mouse. Left-click in the range bar to set the start of a range. Right-clicking will set the end of the range.
- The range can also be shifted freely. To do this, click in the middle of the area and drag the range to the left or right over another file in the timeline.
Converting files
To convert, open the "File" menu and select an option from the "Export" submenu. The following audio formats are available for converting files:
- Audio as MP3: This is likely the most well-known option. Unfortunately, MP3 conversion fee-based due to licensing issues. That's why this option is only available if you purchase the additional package "More tracks and formats" or a Music Maker Edition. This can be found in the program's In-App Store. We'll show you how to do this below.
- Audio as Ogg Vorbis: OGG files are also common and have (almost) the same properties as MP3. The main advantage of this format is that it is available for free.
- Audio as Windows Media Audio: WMA files are also free, this codec is included with your Windows operating system.
- Audio as FLAC: This format is the only, true lossless compression format (aside from WAV). This means it offers the highest sound quality. Even formats with quality loss, like MP3 and OGG, settings can be adjusted so that you don't notice any quality loss or artifacts in the sound. Like MP3, FLAC requires the purchase of the "More Tracks and Formats" add-on pack or a Music Maker Edition.
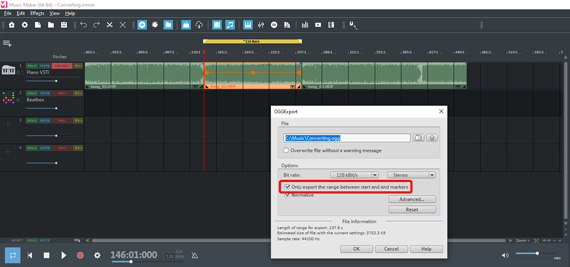
No matter the case, there is an export dialog where you can change the codec settings, i.e. increase or decrease the amount of compression.
- If you only want to convert the current playback range instead of the complete project, be sure to select the "Only export the area between the start and end markers" option in the export dialog.
- Click "OK" and select a target directory where you want to save your files. This is where you will find your converted files and then copy them to your smartphone, for example, or burn them on a CD.
Additional possibilities
Last, here are a few tips on how to get more out of Music Maker when converting files.
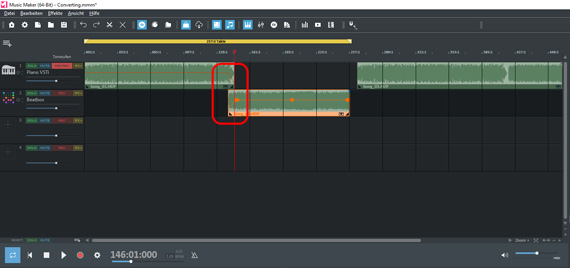
All audio files in the project can be edited easily. For example, you can blend two recordings by creating fades or transitions:
- Move the rear file onto its own track below and drag it forward so that the start overlaps with the end of the first file.
- Click the file above to select it.
Now, handles will appear on the object.
- Drag the handle at the back object edge a little to the left. This will create a fade-out.
- Click the bottom file and drag its front handle to the right. This will create a fade-in.
Alternatively, you can merge the two files on the same track. This willcreate a crossfade. However, it is possible to adjust the fade more preciselyif the two files are on two different tracks.
- Play the transition and listen to the result. If necessary, move the files on the tracks or the fade handles until the desired result is achieved.
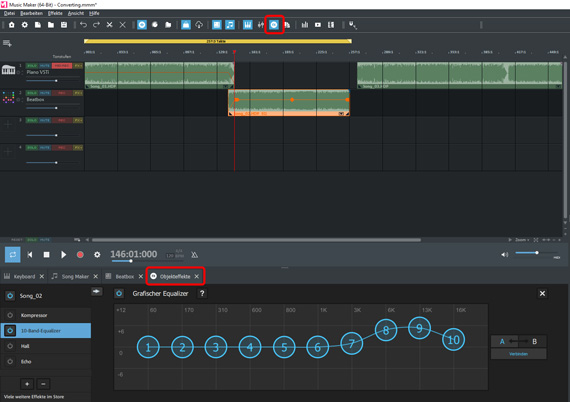
And perhaps a recording could use some enhancement to its audio?
- Click on the FX button in the upper toolbar to open the Object effects These will appear in the lower area.
You can use the equalizer to give dull recordings a little more brightness and transparency. Use the compressor to increase loudness and punch.
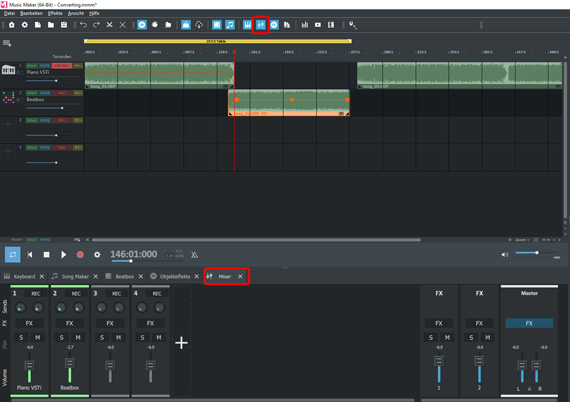
- Use the mixer to balance the volume of files on different tracks, which can be accessed by pressing the "M" key or the mixer icon in the toolbar. You can find additional track effects and a mastering section here as well.
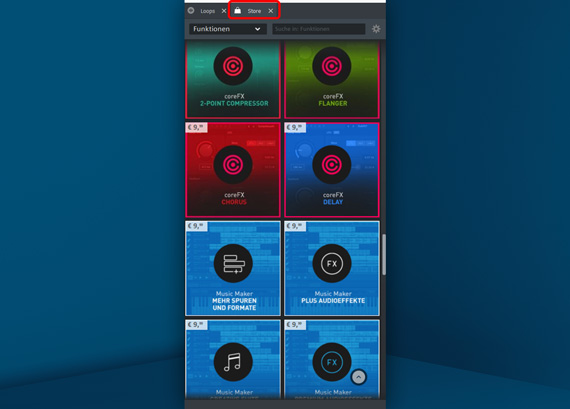
Purchasing add-on packs from the Store
MAGIX offers a number of additional program features, Soundpools and VST instruments that you can purchase from the program's in-app store. For example, the expansion pack "More tracks and formats" offers MP3 or FLAC export.
- Here is how to purchase it: Click on "Store" in the top right.
- Open the "Features" category.
- Click on the icon of an article that interests you. The info window shows what the package contains.
- If you would like to buy it, click on the price and follow the instructions.
Tip: You will not be charged for purchasing free items. For example, some Soundpools are free. All you have to do is register as a MAGIX customer.


- Only now for free in this offer:
- iZotope Ozone 11 Elements ($49 value)
- Native Instruments Hybrid Keys ($49 value)


