The Best Way to Record a Podcast
– here's how it's done.
"How do I record a podcast?" Keep reading to learn how to create your own podcast on your PC.
- Download Music Maker Free, install the free program and start a new project.
- For microphone recordings, click the red button on the left in any track until it says "AUDIO REC".
- Click on the red button in the transport control to begin a voice recording and start speaking into your microphone about your podcast's topic.
- Stop the recording by clicking the "Stop" button in the transport control.
- To use existing audio files, switch to the "File manager" view in the Media Pool on the right and import all the audio files you would like to use into your podcast project. Simply drag & drop it by moving it onto any track.
- To place cuts in your audio, position the playback marker at the desired cut and press the T key. This will split the audio file into two sections.
- Delete unnecessary sections from the track and close the gaps by moving the remaining audio objects together.
- If you hear crackling at the edge of an audio object, you can simply fade it out. To do this, drag the object handles at the top inward to create a smooth fade-in or fade-out.
- You can perform post production on all your recordings using object effects and the mixer. This allows you to create a natural ambient sound or better speech clarity, for example. Adjust the volume of the tracks with the mixer, which can be opened by pressing the "M" key.
- Export your podcast as a WAV or OGG file in the "File" menu.
What to Use to Record a Podcast
Creating your own podcast offers the possibility to produce audio content independently from publishing and editorial organizations and to publish it on the Internet. This new format is becoming increasingly popular: Since 2020, between 30 and 40 percent of all people listen to podcasts.
For many, the time has come to start their own, personal podcast and speak out in public. What you feature in your podcast is up to you: Your opinion on the news, product reviews, scientific analysis, everyday experiences, travel, favorite books, CDs, etc... You can produce podcasts on your own, in a pair, or in a group, adding commentary, conducting interviews, posting roundtable discussions – whatever content and about which ever topics you want to share with the world.
You'll need three things for your podcast: First, a recording device to create your podcasts; second, audio software to arrange and edit your episodes; and third, a website with its corresponding RSS feed to publish your podcast.
For recording feature reports or sound bites, it's advisable to use a digital voice recorder that can comfortably fit in a jacket pocket. You can also record spoken contributions directly on your PC. In most cases, a microphone is already built into the computer and therefore directly available. With an external microphone connected to your computer, however, the recordings become higher quality.
Before you publish a podcast, it usually needs be cut and enhanced in post production. It is often necessary to combine several recordings. This way, you can fade in original recording of background sound while a speaker's voice can be heard, for example, or combine several recordings into one piece. Ideally, you should also arrange and produce your own intro and outro, i.e. a short piece of music or sound collage with trademark value that helps get your listeners in the mood for the podcast.
Most apps are too limited for more demanding tasks like these. The best way is to use a true DAW (digital audio workstation), such as the comprehensive music program Music Maker. The basic version of Music Maker is free and can be used indefinitely. Music Maker Free provides everything you need for podcasts: intuitive editing features, multiple tracks and a virtual mixer to combine different recordings, as well as a collection of professional effects to increase speech clarity, for example.
In fact, Music Maker is actually software for music production, but can also be used for podcast audio editing. If you need background music, everything you need is included: Simply drag & drop the included samples together or play the software instruments using your computer's keyboard for a musical intro or outro. And if you start to want even more functionality, Music Maker can be expanded modularly, up to a fully equipped, professional recording studio for producing more sophisticated podcasts, your own music in virtually any conceivable genre, radio plays or any number of soundscapes.
Despite the versatility for any number of creative possibilities, Music Maker always remains clear, intuitive and user-friendly. Find out how to record, edit and enhance your podcast in post production with Music Maker from this detailed step-by-step guide.
How to Record a Podcast Using Music Maker
If you want to record your own podcast, you don't need any previous knowledge or have to spend any money: Music Maker Free is completely free and includes everything you need for podcast creation.
How to record a podcast on a PC
The original audio recording is the beginning of every episode. The original audio recording is the beginning of every episode.
If you are not using a mobile recording device, but are in front of the PC and want to immediately start, here's how:
- Download Music Maker Free.
- Double-click the installation file you downloaded to install the software.
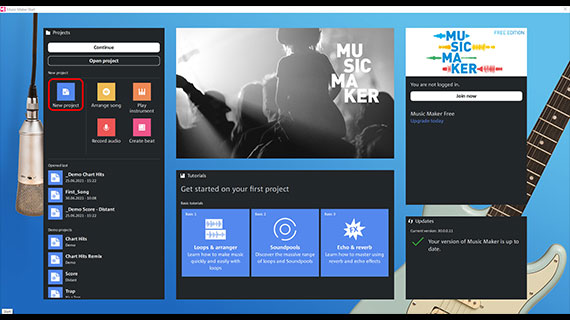
- Start Music Maker and create a new project using the start dialog.
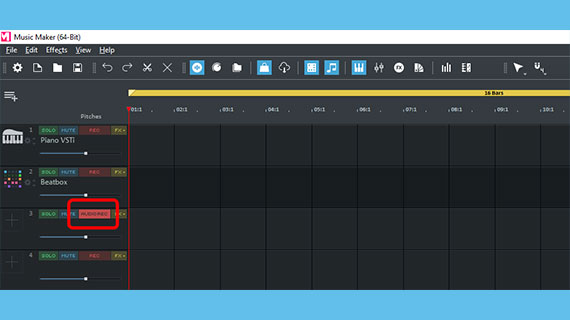

- Switch any track to audio recording mode. To do this, click on the red recording button on the left side of the interface in the track header until "AUDIO REC" appears.
- Click on the red record button in the transport control to start the audio recording.
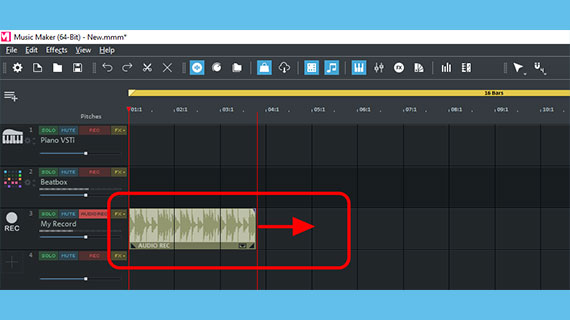
Now, a recording has started. You can now start recording your episode by talking about your topic. During the recording, a sound block will be created that will become increasingly longer as the recording continues.
If you would like to retry the recording because something went wrong, click the red record button again. Then, the recording will start again from the beginning and the previous, flawed take will be overwritten.
- When you're finished, click on the stop button.
Complete. To play back the recording, press the spacebar. To jump to a specific location in the recording, click above the first track in the timeline with the time information. This moves the playback marker.
To repeat a passage because you misspoke, for example, first place the playback range over the passage. The playback range is defined by the yellow bar above the timeline. You can shorten it at its ends and reposition it over the desired area.
Next, click on the red "Record" button. The recording will start at the beginning of the yellow playback bar. The parts in front of and behind the playback range will remain. The playback range will be overwritten with a new recording as many times as necessary until you press the stop button.
Importing podcast recordings
If you've recorded using a Dictaphone or would like to use other audio files, you can easily import the files into Music Maker:
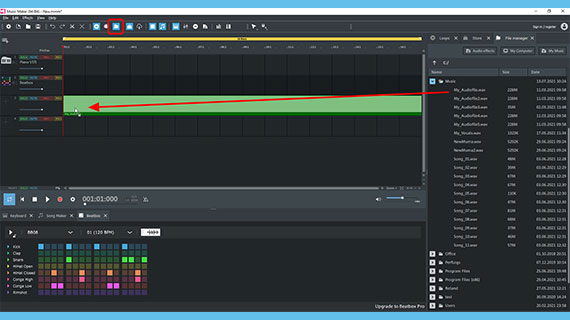
- Switch to the File manager view in the Media Pool. Above right, click on the "File manager" button.
- Go to a folder containing the audio files that you would like to import and edit.
- Drag & drop the files on the left in the tracks.
You can insert any file at any position. Drag files with similar audio material one after the other onto the same track. You can drag various types of source audio to different tracks so that you can use the mixer to adjust the volume later.
Editing podcast audio
You can cut out all unneeded passages afterwards and edit the usable ones with effects and balance them in volume.
Let's start with noises. Occasionally, an otherwise successful recording is not perfect across the entire recording. To remove distracting noises or a slip of the tongue, simply cut them out of the material.
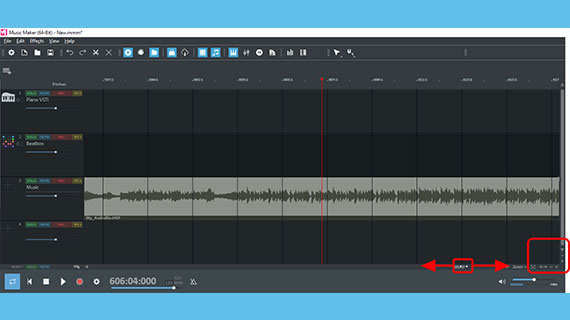
- If necessary, zoom in to see the passage in the waveform better.
There are several options for zooming:
- You can use the buttons in the lower right corner of the track range to zoom in horizontally and vertically.
- The scroll bars can be moved together or dragged apart for zooming. Move the mouse to the edge of the horizontal scroll bar until it turns into a double arrow. You can now hold down the mouse button to move the bars together and zoom in to the display.
- Zooming is particularly easy if you're using a mouse with a mouse wheel. Just hold the Ctrl key and the shift key while using the mouse scroll wheel to zoom.
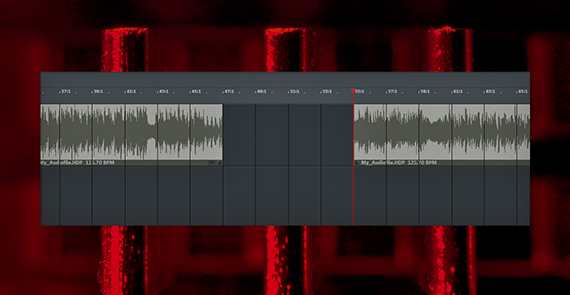
You can use the waveform display as a visual guide. Loud noise can be identified by the high peaks visible in the waveform. A passage of silence appears flat. When a point where you want to make a cut is clearly visible, place the playback marker just in front.
- Click before and after the noise and press the T key at both positions.
This will cut out the section with the noise.
- Click on the noise between the cuts you just made and then delete it from the track with the Del key.
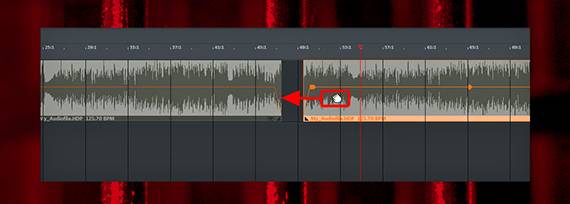
This creates a gap in the recording.
- Click on the back object and drag the section on the right of the gap to the left with your mouse until it docks with the preceding section.
Now, the gap in the track has been closed.
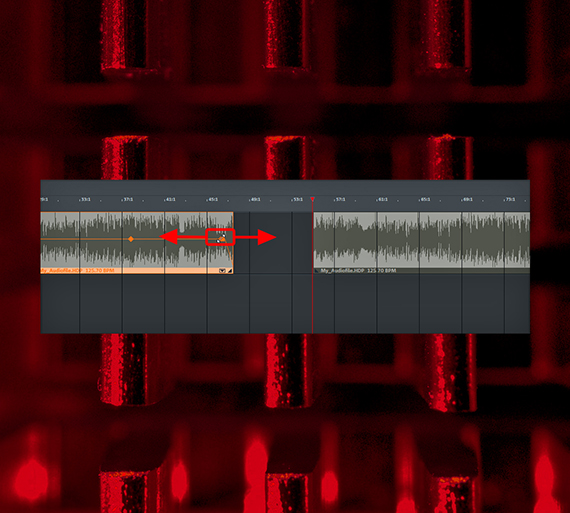
Occasionally, incidental noise can be heard at the beginning and end of an audio recording, for example when a button on the recording device is pressed. These noises can be removed easily with a different method:
- Move the mouse pointer to the left or right object edge until it turns into a double arrow.
- Click and drag the object inward using the object edge.
This creates a fade, wherein the object is gently faded in or out. This makes it possible to remove clicks on cuts located at object edges.
To combine several files with one another, drag one below the other on two tracks. Keep in mind that the individual volumes are added together in the process. To edit the volume, use the mixer (this topic will be covered shortly).
If you want to cut complementary audio into an existing recording without mixing the two sources, first split the existing recording (using the T key). Then, move the back part further out, so that a gap is created and drag the supplementary audio material into this gap. Finally, drag the objects together to close the gap.
It is very important to listen to everything again at the end, paying particular attention to the transitions. If you hear clicks, remove them using the fade handles on the object edges.
Optimizing a podcast recording
Once all the recordings of your podcast are ready to be edited, applying and processing effects and balancing volume levels follows.
Maybe your voice recording sounds a bit muffled or should be more present in the mix?
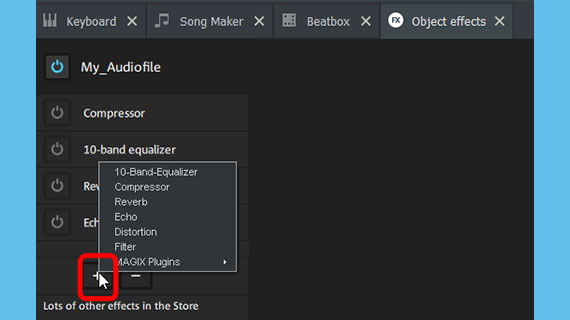
- In the lower area, switch to the "Object effects" view.
A compressor can be found here to add volume and punchiness along with a 10-band equalizer to enhance specific frequency ranges, reverb, as well as a number of other effects.
- First, you must always select the audio object in the track before you can start setting up the desired effect.
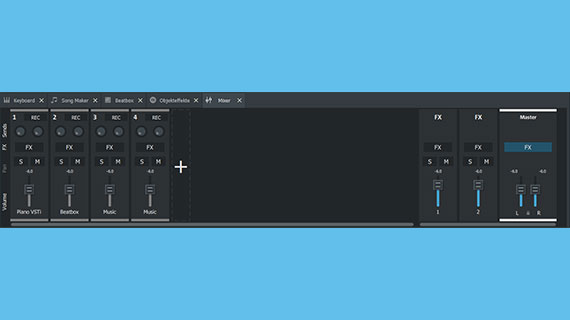
If you have several tracks, it is important to configure the volume and the stereo panning of the tracks in relation to one another. This can be done using the mixer.
- Click on the mixer button (or simply press the M key).
A volume and a pan control is available for each track in the mixer. The FX buttons on top of the channel strips are used to apply additional track effects, which can be used on all objects in the corresponding track.
On the right in the mixer, you'll find the mastering section for controlling the overall sound. With the master effects, you have access to additional effects for the overall mix. This is where the limiter, which is activated by default, is especially important. It prevents unwanted clipping by automatically cutting the signal as needed.
Recording intros and outros for a podcast
To create a musical trademark in the shape of an intro and outro, compose a short musical sequence from Soundpool loops.
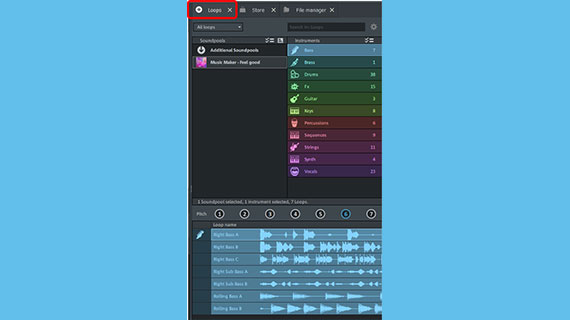
- In the top right, open the "Loops" tab.
In the beginning, only the Soundpool "Feel good" will be shown in the Soundpool list, as it is installed at no cost with Music Maker Free. You can install additional Soundpools from virtually any conceivable musical genre at any time later (we will cover this at the end of this article).
On the right, you can select the Soundpool's sound category (e.g. drums, bass, keyboards, etc.). In the area below, you can select the available loops from the corresponding category.
- Click on a loop to begin listening to a preview.
- Drag & drop the loop at the desired position in the arranger to use it.
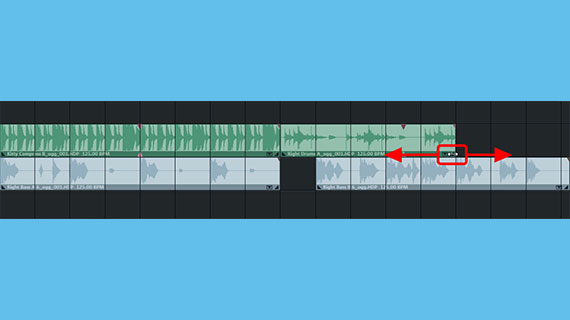
It works like a musical puzzle: You arrange loops to make your own music and soundscapes.
- If you move the mouse to the back edge of a loop, the mouse pointer will turn into a double arrow. Now, click on edge of the object and shorten or lengthen the loop from that point to the right to the desired length.
- Every loops (with the exception of atonal drum loops) can be set to seven different pitches. You can change the pitch by clicking one of the seven pitch buttons above the loop library. This lets you create chord changes and variations.
Now that you've learned the basic idea, you can freely experiment with loops until you have an intro and outro that you like.
Using software instruments to create background music for a podcast
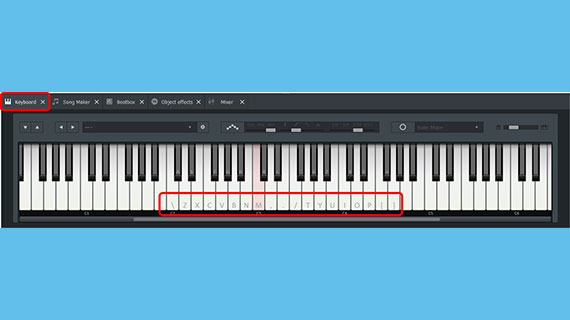
Another option for composing your own background music is to record using the included software instruments. These instruments can be played directly using the computer keyboard. This is enough to begin composing a few unique lines of melody.
At the bottom of the interface, you'll see a large keyboard with a piano keyboard. The default instrument sound is a concert grand piano.
- Click once on the keyboard to activate it.
Letters will now appear on some of the keys. These keys can be used to play the indicated notes on the computer keyboard.
- You can play the normal C major scale using the top row of characters on your computer's keyboard. It is the easiest to use this row of keys to play melodies when starting out.
Through trial and error as well as a little practice, you'll learn to play instruments with dynamically and accurately on the computer keyboard.
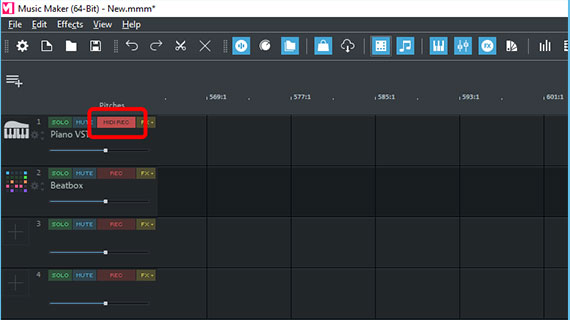
To record your playing, you need an "armed" MIDI track, on which you wish to record.
- Click on the red recording button on the left side of the interface in the track header of an empty track until "MIDI REC" appears.
- Click on the red "Record" button in the transport control.
Now, a MIDI recording will start.
This recording process works the same way as recording audio, as described above. While recording, the other tracks are played back.
- When you're finished, stop the recording by clicking the "Stop" button in the transport control.
Now, you will see your recording in the track and can play it back together with the rest of your arrangement or, or example, apply effects to it.
There are several ways to change instruments. The easiest way is to open the dropdown menu above the keyboard and select a different instrument. You can use this process to preview the same MIDI recording played by different software instruments.
Exporting a podcast
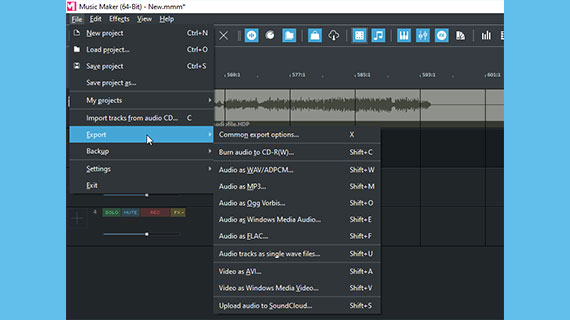
Last, when your podcast is recorded, completely edited and includes an intro and an outro, export it as a WAV file or in the compressed format OGG.
- Choose "File" > "Export" and the format you want.
During export, all tracks in the arranger are mixed down together with all effects and mixer settings into a new audio file.
The final result will sound exactly the same as when played back in Music Maker. When finished, you have one "proper" audio file with your podcast. You can upload the file and publish it on your podcast's website online.
Get additional Soundpools and instruments for free
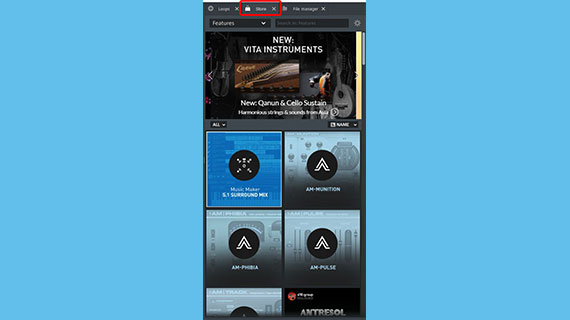
In the free version of Music Maker, one Soundpool named "Feel good" and three virtual instruments are installed. MAGIX offers many additional Soundpools, instruments and program modules for installation later. Some of these are even available free.
- Click on the "Store" tab in the Media Pool.
- Specify a category of items. Additional program modules can be found in the "Features" category.
- Click on an icon of an article that interests you.
- Click on "Purchase" and follow the provided instructions.
You will not be charged for purchasing free items. All you have to do is register as a MAGIX customer.


- Only now for free in this offer:
- iZotope Ozone 11 Elements ($49 value)
- Native Instruments Hybrid Keys ($49 value)


