Join audio and video – here's how!
Follow these steps to cut and edit the audio from your video:
- Open Movie Studio Platinum and drag & drop to import your video from the Media Pool onto Track 1, the top track.
- If you want to edit the video audio track in detail, first make the track visible. Right-click on the video and select "Audio functions" > "Video/Audio on separate tracks" in the context menu. This splits the video into two objects: A video object without sound on Track 1 and an audio object without images on Track 2. For detailed editing of the audio track, it's advisable to create a waveform display. For a better understanding of what's happening acoustically on the audio track, you can have the audio editor software visualize it. To do this, right-click on the audio object in Track 2 and select the option "Create wave form".
- In many cases, the original sound of the video will need to be replaced by an audio recording that has been created separately. To do this, load the audio recording to the empty Track 3 and enable the waveform display (see above). You can then use the waveform display to synchronize the two audio tracks. Move the audio object so that the waveform display lines up with that of the original sound on Track 2 and so the two waveforms match. Switch the original sound track on Track 2 to solo mode by clicking the S button in the track header on the left.
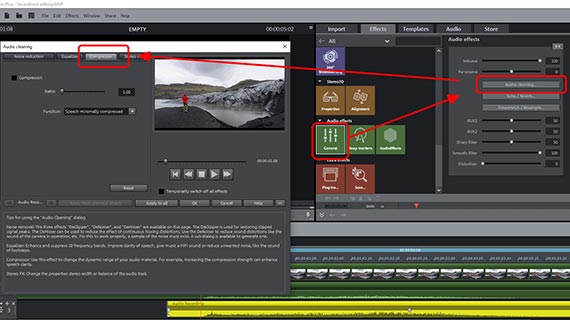
- To enhance the audio track, double click on the audio object. This opens the "Audio cleaning" effect dialog. This tools offers you access to a sophisticated noise removal tool as well as a compressor and an equalizer. The compressor allows you to increase volume for quiet passages and improve the clarity of speech. The EQ enables you to enhance audio characteristics that are dull or filter out rumbling noises.
- For additional video audio track editing, open the audio mixer using the "M" key. Here, you'll find a separate volume control for each project track. You can work with multiple tracks at once and mix them. For instance, combine the original sound recording of the video with an additional audio track containing noises and another with background music.
- For dynamic volume control, enable a volume curve in the context menu for an audio object. Double-click on the curve and new curve handles will appear. The handles can be moved freely and can be dragged down to decrease volume, or up to increase it.
- Once everything sounds good, go to "File" > "Export movie" and select an export format in the sub-menu (e.g. MP4). In this way, all the audio tracks you use will be exported together with the video track as a video file. You can also transfer the video to your smartphone or burn it to disc.
Edit sound in video with Movie Studio Platinum, the video editing software for downright amazing movies:
- Import all common audio and video formats
- Edit, exchange & combine multiple tracks
- Audio mixer for volume balance and effects
- Audio effects (normalization, compressor, 1-click effect templates)
- Professional sound mastering, complete with multiband compressor and limiter
- Track curves for dynamic volume control
- Helpful program wizards
- File conversion into all essential formats, CD burn function and direct transfer to smartphone
Edit sound in video – what you need to know
In addition to moving images, videos almost always contain an corresponding audio track, which also has to be edited after recording. In most cases, the original sound of a video needs to be supplemented with further audio material. The name of the process of optimizing, cutting, substituting or joining the audio track of a video with a video sound editor is called dubbing.
Generally, extra tracks with background music, a narrator's commentary and additional sound effects are combined with the original sound recording of the video. All of these audio tracks are cut and edited first using a video sound editor. Then, their volume is balanced out collectively and they're joined together. This will create a finished video containing a single stereo audio track with the ideal balance of volume for all the sources of sound.
Free video applications and shareware programs are easily overwhelmed by these kind of demanding audio track editing tasks. Video and audio editing software Movie Studio Platinum provides a much better alternative. With this video and audio editor, you can access professional video editing features as well as a range of tools for soundtrack editing.
Our step by step guide below shows you how to edit sound in video using Movie Studio Platinum.
Edit sound in video with Movie Studio Platinum
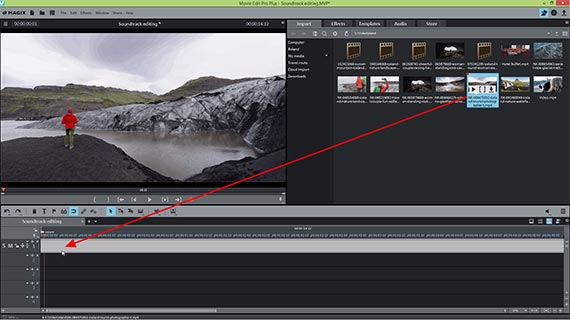
Edit video audio track: Import video
First, import your video into Movie Studio Platinum.
- Open Movie Studio Platinum and create a new project.
- In the Media Pool in the upper right, locate the folder containing your video file.
- Drag & drop the video file into the program. To combine several videos, insert them one-by-one to the top track.
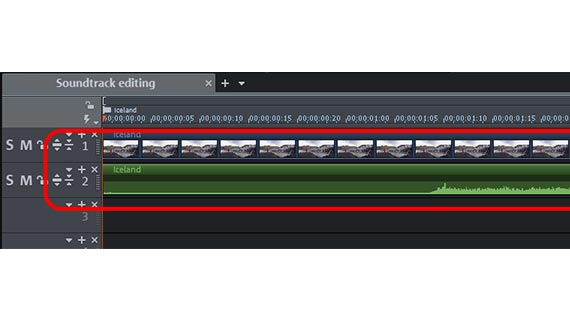
The video on the top track contains a video track as well as an audio track. You can't see the sound track when you play the video. To display the audio track, do the following:
- Right-click on the video and under the option "audio functions" > "Video/Audio on separate tracks".
Now the video and audio tracks will be shown separately. Track 1 is the video track and Track 2 is for the audio.
You can also view the waveform of the audio track to gain a better understanding of the audio track:
- To do this, right-click on the audio object in track 2 and select the option "Create wave form".
A waveform will appear. The waveform isn't strictly necessary when using a video sound editor, but it's recommended, as it provides you with a clear overview of your audio material.
Edit video audio track: Cut soundtrack from video
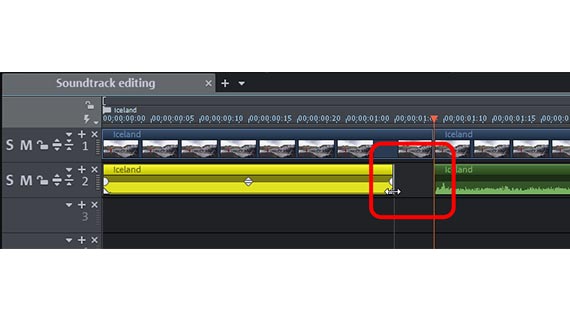
- To cut the audio track in the video, place the playback marker where you want to cut, and then press the "T" key.
Both the video and audio tracks will be cut together. Sometimes the original sound on Track 2 needs to be cut independently of the image on Track 1.
- Hold down the Alt key and move the mouse pointer down to the object border handle until it turns into a double arrow.
- Click and drag the audio object left to make the previous section shorter, or move to the right to make the following section shorter.
The image and audio tracks are ungrouped briefly during this cutting process. They will be grouped together afterwards to ensure the audio and video join.
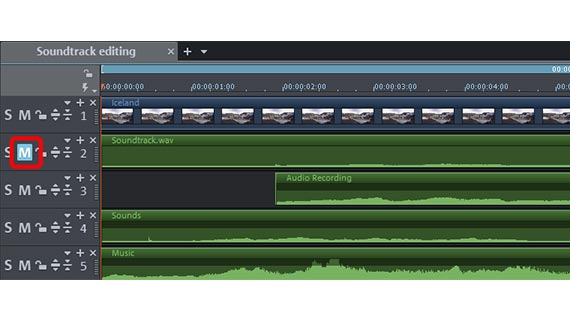
Dubbing: Increase volume automatically
Built-in microphones in camcorders or smartphones are usually not as high-quality as the lens, as manufacturers don't usually invest in the audio recording side of things. That's why we recommend using a separate audio recorder and an external microphone to record video audio, as you'll achieve higher sound quality this way.
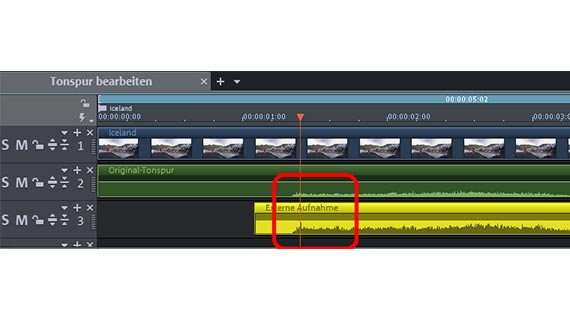
If you do things this way, you'll have the replace the audio track of the video recording with the audio recording you created separately. You can do this in the following way:
- Load the external audio recording to an empty third track.
- Enable waveform display for the audio recording, in the same way as for the video audio track.. If you need to, zoom in on the display by holding down Ctrl and scrolling with the mouse wheel.
- Use the waveform display to synchronize the two audio tracks. In other words: Move the audio object on Track 3 so that the wave peaks and valleys line up with those of the original sound on Track 2 and so the two waveforms match.
- The mute the original sound track by clicking the M button in the track header on the left.
- To join audio and video in a more detailed way, use the video image to sync things up. Move the new audio track until the sound lines up exactly with the images.
You can add additional audio tracks in a similar way:
- Drag a music file for a backing video soundtrack onto a unoccupied track.
- Drag more files containing noises or sound effects onto another track and arrange the two tracks so that they fit the video track.
When you play the video, the combined audio tracks will automatically be mixed together, and their volumes will be summed.
This can easily lead to clipping. For this reason, you should edit the volume of the different audio tracks too.
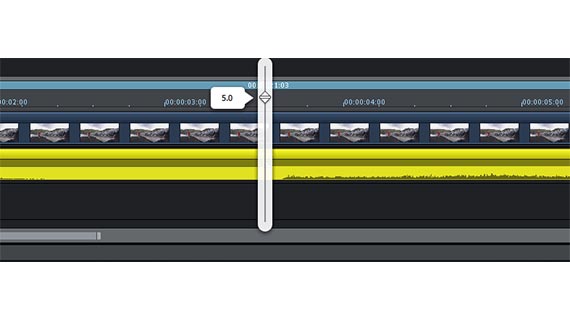
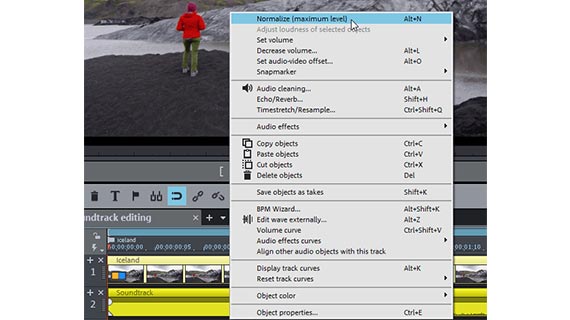
Video audio track: Edit soundtrack volume
To increase the volume for an audio track, you have various options to choose from:
- Place the mouse on the object handle in the middle of an audio object. The volume fader will display.
- Click and drag the volume envelope up while holding down the mouse button to increase the volume, or down to reduce it.
The method is especially easy. However, clipping can easily occur at loud sections. A crackling sound in your audio is an indication of clipping.
Rather than increasing video volume manually, use the normalization feature. This ensures that clipping won't occur anywhere in the audio track.
- Right-click on the audio object and in the context menu that appears, select "Normalize (maximum level)".
When you normalize volume, the tool you use will automatically scan the audio track for the point with the highest volume and then set it to the highest possible level of 0 db.
However, this might not be enough, since a single loud section in the audio is all it takes to "push down" the entire audio signal. For instance if you accidentally bumped the mike during recording, this single loud rumble noise will mean that all other parts stay quiet because the audio track can no longer be made louder.
You can resolve this issue by cutting the audio track into sections and normalizing the cut audio objects separately. You should proceed as follows:
- Place the playback marker just before a loud section in the waveform and press the "T" key on your keyboard to split the audio track into two separate objects at this point.
- Place the playback marker after the peak and press the "T" key again. This cuts the audio object again.
You have now cut the audio track into three objects, which You can now normalize all three audio objects separately. You can deal with particularly loud sections that negatively influence the master volume in this way. This will significantly increase volume for the audio track.
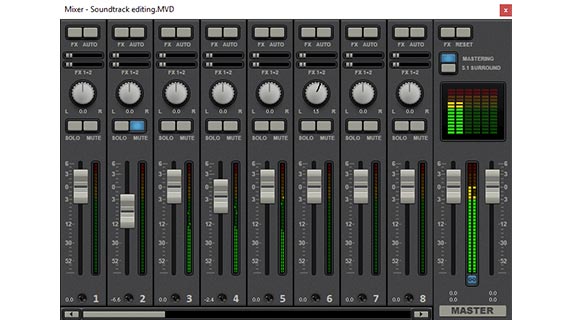
Video audio track: Edit master volume
Video and audio editor Movie Studio Platinum contains a virtual mixing desk for mixing together multiple audio tracks and balancing their volume. It's great for editing single audio tracks too.
Every project track contains its own volume fader. Master volume can be set in the "Master section". This includes two faders for adjusting levels for the left and the right channel of the stereo master signal separately.
- During playback, follow the peak meter display in the audio mixer. You can check volume for any video audio track and for the overall output in this way.
- The "FX" buttons are located above on the channel strip. These contain effects that affect all audio objects on the track simultaneously.
- Via "Mastering" on the right you can open the effects for the overall sound. The limiter can be used for preventing clipping. The limiter analyzes signal peaks and eliminates distortion by bringing any levels set to over 0 db down to 0 db. With the "MultiMax" multiband compressor you can split the frequency spectrum into three ranges. Use this to keep all deeper sounds uncompressed and work only on higher frequencies by using precise compression to give them higher volume and more presence.
The effects in the audio mixer offer many options for volume and sound optimization and are a unique feature in video audio track editor Movie Studio Platinum.
Edit video audio track using audio effects
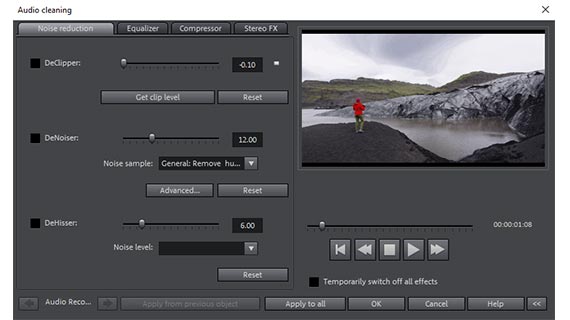
As already mentioned, the volume of individual tracks can only be increased to a limited extent. You can use a compressor to increase the volume of an audio track further without the risk of any further clipping. There's no need to worry about clipping when using the compressor, since it will increase video sound of quiet passages whilst leaving loud ones unchanged.
It's a good idea to use an equalizer too. The equalizer can be used to eliminate low rumbling, for example, by cutting the low frequencies. Or it can also be used to emphasize mids and highs thereby enhancing the sound.
The noise reduction feature allows you to filter out background noise such as hissing, crackling or crackling from the audio track.
All these optimization effects can be found in the "Audio Cleaning" dialog in Movie Studio Platinum.
- In the Media Pool, open the "Effects" tab and click on the icon "Audio Effects".
- Click on the "Audio Cleaning" button in the effect dialog.
The equalizer (in contrast to the compressor) can create unwanted clipping. You can prevent clipping by working in an indirect way. This means you lower the area on either side of the frequencies you want to emphasize.
Editing volume can sometimes have side effects: When parts are made louder, noise in these parts can be made much louder too. If this occurs, you can set up a noise removal process.
- Use the DeHisser to reduce background noise.
- If the results still aren't what you're looking for, use the "DeNoiser". First choose a type of noise interference (e.g. "Tape noise removal") and then set the level for the DeNoiser effect using the slider. Frequencies from the noise sample will be filtered out of the recording as a result. You can also create a noise sample directly from your video and use it for the filter.
Tip: If this seems a bit too complicated, you can take advantage of pre-configured effect presets in the "Audio effect presets" in the Media Pool. These can be used to easily modify volume and enhance sounds. You can preview each effect preset first and then simply click it to apply to the audio track.

Using a video audio editor: Voice-overs
Using a voice-over is a good way to describe what's happening in the video and really grabs the viewer's attention. You could also work the other way around and use a spoken commentary as the basis for the video and illustrate with video images.
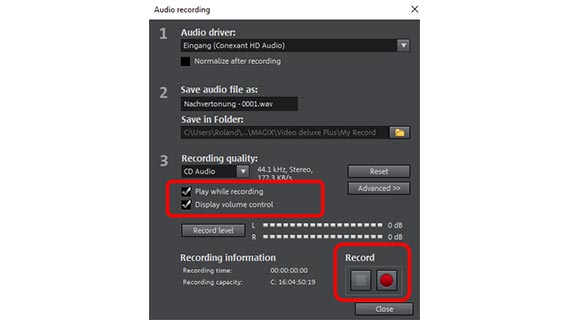
Either way, you'll need a microphone. First, make a test recording to check whether the recording sounds good and is loud enough. Once you have connected your microphone to the computer, do the following:
- Click on the red "Record" button underneath the video preview monitor.
- Select "Audio" from the recording dialog.
- Activate "Show levels". Speak into the microphone while checking the level display in the dialog. If clipping occurs, reduce the input signal. You can also speak more quietly or further away from the microphone.
- Be sure that the checkbox "Playback while recording" is activated before you start recording, so that you can see the video track and comment on it.
- Start the recording. Observe the preview monitor in Movie Studio during the speech recording and at the end, click on "Stop".
After recording, you will be asked whether you want to add the recording to your project. If you're not satisfied, this isn't a problem – you can repeat a recording as many times as desired.
After making an acceptable recording, it will be inserted as an audio object onto a free track.
Using a video sound editor with track curves
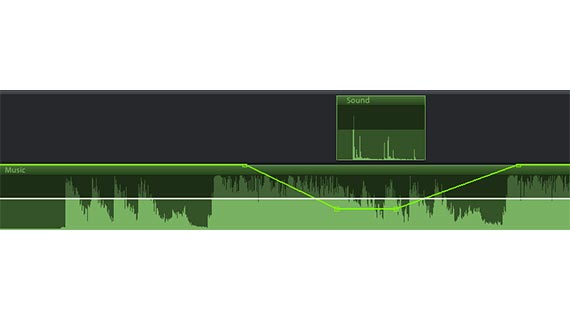
When working with multiple audio tracks, it's often necessary to briefly lower an audio track if someone is talking at that point on another track (this is known as "ducking"). This can be achieved in Movie Studio Platinum using what are known as volume curves. Working with volume curves means that there are no instances of clipping, because object volume can only be reduced and not increased.
- Activate the volume curve in the context menu of the audio track (right-click in the audio object >"Volume curve"). A curve will appear as a thin line within the audio object.
- Double-click on the curve and curve handles will appear. Make sure to click exactly on the curve, otherwise the "Audio cleaning" dialog will open. If you need to, zoom in on the display.
- Move the curve handles up and down to increase or lower the volume respectively.
A "U" shape lowers the volume and then increases it again (ducking). For this you'll need a total of four curve handles: Leave the outer two handles the way they are and drag the middle two handles in and downwards. Controlling volume in this way is ideal when you want certain audio events to be clearly audible. The background music is then ducked at this point, then increases afterwards.
Tip: Movie Studio Platinum offers helpful functions for automatic volume reduction ("Auto Ducking"). First, cut the sequence into an independent object. Right-click this object and choose "Volume reduction" from the shortcut menu.
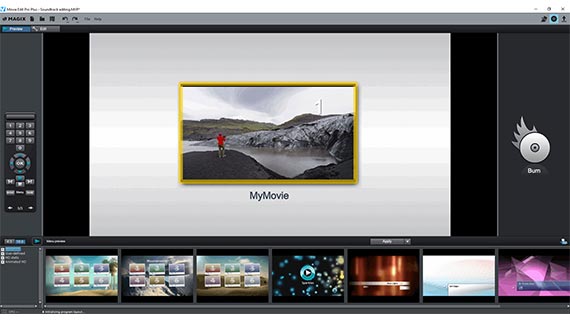
Using a video soundtrack editor – Export
Finally, when you've balanced volume of the audio tracks and enhanced sound, you can export your video in a variety of formats.
- Create video file: Go to "File" > "Export movie" to create a new video file e.g. in MP4 or MOV format. There are a range of codec settings and presets available in the Export dialog.
- Burn to disc: You can also burn your video to disc. To open the "Burn" interface, click on the button with the disc icon in the upper right corner of the program. Pick a selection menu and a disc type (DVD, AVCHD or Blu-ray Disc), then start the burn process.
- Upload to the Internet: Vimeo and YouTube are directly connected to the program. Click on the arrow symbol in the top right to open the dialog "Finish movie" and upload the video to your profile.
- Transfer to smartphone: In the "Finish movie" dialog you will see the option "Export to mobile device". Select a device here, and Movie Studio Platinum will handle the rest. The video will be exported first in the correct format, and then output to your device.


Edit sound in video with Movie Studio Platinum, the video audio editor for downright amazing movies:
- Import & export for all relevant formats
- Quick cut & detail cut
- Automatic wizards
- Up to 900 effects & music
- Intuitive templates for intros, outros, subtitles, transitions, opening credits and much more
- Burn videos to DVD & Blu-ray (and design your own menus)


