How to create jump cuts
To place jump cuts in a video, follow these steps:
- Open MAGIX Video Pro X and import your video.
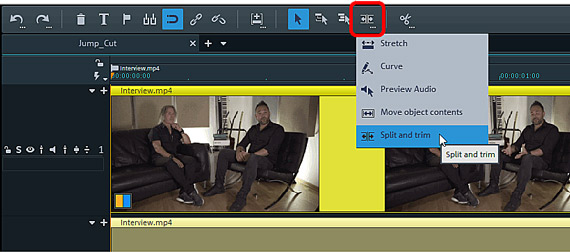
- Right-click the Mouse Mode button below and select "Split and trim".
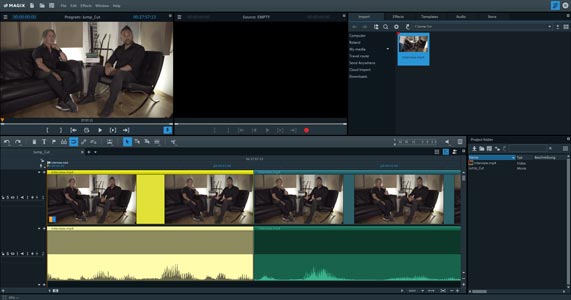
- Place your mouse over the video in the track. The video preview will display the corresponding position in the video. You can also show the wave form display for the audio track by right-clicking the video. Search your image and audio material for suitable spots to cut out.
- Click where you want the jump cut to begin. Hold the mouse button down and drag the mouse to the right to the point where you want the jump cut to end.
- Switch back to the standard mouse mode and close the gap created by the cut you made by dragging the object located to the right of the gap to the left until it snaps to the object before it.
Add jump cuts using the professional video production program MAGIX Video Pro X:
- Make precise cuts at the frame and sample level
- Professional cutting, splitting and trimming tools
- Professional editing
- Export in the most common and important file formats/burn direct to DVD and Blu-ray/upload direct to online platforms
What are jump cuts?
Jump cuts are a stylistic method used to created a jumping effect in videos. When applied to video material of a person speaking, jumps cuts create the visual impression of sudden and abrupt changes in the posture and facial expressions of the person. At times, the person may even appear to suddenly move from one position to another in the video picture.
Jump cuts go against the traditional editing principle that edits should be as unnoticeable as possible. In fact, they purposefully interrupt the continuity of the movie in a manner which is intentionally visible to the viewer, creating the effect that a piece of the movie (and hence a portion of what is happening) is missing.
In this way, jump cuts are used to accelerate the pacing of the movie. Like time lapses, jump cuts generally accelerate the speed at which an event is shown. Hence, jump cuts make movies appear faster, more streamlined and more dynamic – and sometimes a bit hectic.
How to create jump cuts
Creating your own jump cuts doesn't take much in terms of equipment or software: All you need is a good video editing program like MAGIX Video Pro X which lets you easily search through your material to find suitable positions to add cuts to. The main difficulty in creating jump cuts is actually identifying the best positions in your material to add cuts to and finding the right timing.
Where should you place cuts, and how often should you place them? This depends heavily on the material you are using, and there's no one-size-fits-all answer. It takes a certain feeling for what's essential and what the right dosage is. Add too many cuts, and you'll end up with a hectic and busy video which most viewers won't be able to watch for long. Add too few, and the cuts themselves will look like errors. You should always use multiple jump cuts in a single scene to make it clear to the viewer that they are intentional.
To find the right positions to add cuts to, start by looking for parts of your video which appear superfluous. In videos where someone is speaking to an audience or to the camera, these spots can be easily found by looking in the audio track for pauses or parts where the speaker is clearing his or her throat – and then cutting these parts out. But not every scene needs to contain jump cuts. Let your viewers enjoy a bit of continuity too – sometimes less is more.
Below, we show you how to add this kind of motion effect to your video material.

Step 1: Import videos to add jump cuts
- Open MAGIX Video Pro X.
- Under the "Import" tab in the Media Pool, navigate to the folder which contains your video files.
- Place your mouse cursor over a file and click the small Play button in the pop-up window. This will trigger the preview feature. A preview of the video will play in the monitor to the right. You can use this method to easily search for the videos you want to use in your project.
- Import all of the videos you want to use into MAGIX Video Pro X by dragging and dropping the videos onto Track 1 one at a time. You can also add sections of a video file by using the Set Range buttons at the bottom of the preview monitor. To import a defined video section (range), click directly on the video picture in the preview monitor and drag and drop in onto the track.
You can also drag and drop videos or video ranges into the project temp folder in the bottom right-hand corner before adding them to a track in your project. The temp folder acts as a sort of clipboard for your projects where you can conveniently compile all of your media for easy access before you starting editing.
Once you've imported your videos, they will appear as objects in the track you added them to. These objects contain both the picture and audio data for the file. It's often a good idea to have the audio tracks displayed separately to make it easier to use the audio material to navigate through the video for editing.
- To show the audio tracks, right-click the video objects and select "Audio functions" > "Create wave form display".
The program will then calculate the wave form for the audio and display it in the lower section of the object.
Orienting yourself in your video material is even easier when the audio and picture are displayed as separate objects on two separate tracks.
- Right-click the objects again and select "Audio functions" > "Video/Audio on separate tracks".
- Use the zoom buttons (bottom right) to zoom in on both tracks until you can see every detail.
Now that you can see your material well, it's time to start placing jump cuts.

Step 2: Place jump cuts
Next, you need to cut your material. There are several ways to do this.
1. The standard method
To find suitable positions in the material, play the video. The easiest way to do this is to press the space bar on your keyboard. When you come to a part you want to cut, press the space bar again. Playback will stop, and the playback marker will be located at the current position in the video.
- To make a cut at the position of the playback marker, press T.
The object will be cut into two parts.
- Zoom in so that you can see the cut in detail.
The easiest way to do this is to press and hold the Ctrl key and scroll with the mouse wheel. The display will zoom at the position of the playback marker.
- Place your mouse over the position of the cut and move the first video part to the left or the second video part to the right to create a gap.
This will remove video material from the position of the playback marker. Preview the results by playing the video at the position of the cut. You can make the gap as large as you want or you can close it again until you've found the right part to remove.
- Close the gap on the track by simply dragging the object after the gap to the left until it snaps to the object before it.
Play the current position of the movie to preview the results. You should see a seamless jump cut with a corresponding motion effect in the preview monitor to the left.

2. The quick method
The quick way to create jump cuts requires a special feature in Video Pro X.
- Right-click the Mouse Mode button below and to the right and select "Split and trim".
In this mouse mode, you can move your mouse over the video object and see the corresponding position in the video material right in the preview monitor. This mode works similarly to a scrub wheel, making it ideal for finding suitable spots for jump cuts.
The video material shown in the preview monitor is played at the same rate that you move your mouse. If you move your mouse slowly, the material is also played slowly. If you move your mouse from right to left, the material is played in reverse.

- To make a cut at a suitable position, simply click with the mouse.
- To cut out a range of video material, click and hold down the mouse button and drag the mouse to the left or right.
The easiest method is to click the position where you want the jump cut to begin and to drag the mouse to the right to the position where you want the cut to end and where the video should continue playing.
Leave the resulting gaps alone for now and proceed to the next spot where you want to add a jump cut. There, repeat the same procedure.
You can use the peaks in the wave form to navigate through the video material. Groups of connected peaks should be left alone because they typically indicate a section where someone is speaking. Sections with few peaks usually indicate a point in the video with little spoken audio. These can be cut out.
- Finally, close all of the gaps on the timeline by moving all of the objects that come after the gaps to the left until they snap to the objects located to the left of them.

Step 3: Export your video with jump cuts,
burn it to disc or upload it to the Internet
Lastly, export the video material in the project window as a video file or burn it to disc.
- Go to "File" and select the option "Export movie". Select the format you want to use (e.g. MP4), give the video file a name and start the export process.
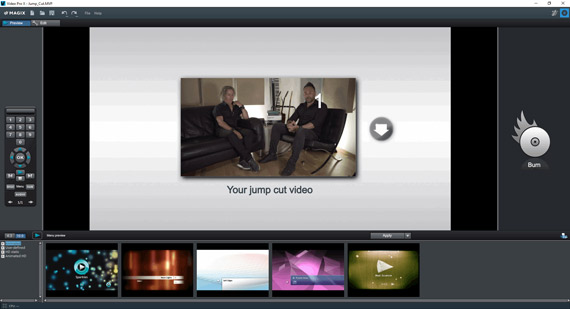
- Alternatively, you can burn your project to DVD or Blu-ray Disc. Simply click the button in the upper right-hand corner of the program window to open the burn interface. Here, you can also create your own selection menu.
- You can also upload your video directly to YouTube. Simply click the Export button in the upper right-hand corner, select "Upload to Internet" and select "YouTube" as the Community.


